
Owner’s Manual 2016


34
MOST SOLVENTS ARE HIGHLY FLAMMABLE. WEAR EYE
PROTECTION AND PRACTICE APPROPRIATE SAFETY MEASURES
WHEN WORKING WITH SOLVENTS TO AVOID SERIOUS INJURY.
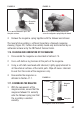
8. Thoroughly clean all of the parts of the pistol.
9. Check the disassembled parts of the pistol for signs of wear and/or
damage. In case of doubt about the condition of a part, consult your
dealer or departmental armorer.
10. Using a soft cloth moistened with storage lubricant, lightly apply
lightweight gun oil to all the external surfaces of the metal parts.
The polymer grip does not require lubrication.
11. Apply one drop of lubricant to the locations shown in Figure 20
and Figure 21 on page 35.
12. Assemble the slide, the barrel and the recoil spring.
13. Assemble the pistol as described in Section 17.4.
14. Clean the outside of the pistol in order to remove dirt, fingerprints and
excess lubricant.
17.4. ASSEMBLING THE PISTOL
To assemble the pistol, follow the steps listed in Section 17.1. in reverse
order, taking into account the following points:
1. Insert the barrel into the slide and ensure the muzzle is
oriented correctly.
2. Ensure that the front end of the recoil spring fits correctly into its
position in the slide and that the rear end of the spring fits correctly
onto the barrel lug.
3. Line up the rail grooves in the slide correctly with the guides on the
frame and replace the slide on the frame.