
Fireplace Manufacturers Inc Outdoor Fireplace User Manual


14
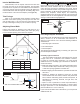
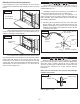
Figure 21
CombustionAirAccess
RightorLeft(Rightshown).
Apply
mortar
Applymortar
SideWall
RearWall
SideWall
When you have arranged all the components into place7)
and you are working on the top rear rebox, check that
your work is level. If you need to, you can make some
adjustments in the top surface of the box assembly
simply by using shims. Once you are satised with the
degree of levelness, you can address any gap that may
have occurred with an appropriate amount of mortar.
Although you are cautioned to use mortar sparingly
because it does have such holding power, you should
look over the rebox assembly at the end and ll any
gaps with mortar especially at joint connections.
Adjustmentsmustbemadetoensurethereplaceislevel
andsquarewhilethemortarisstillwet.
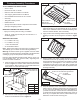
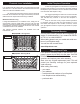
Afterfourthrowofwallsareinplace,add36”rebartoall8)
cells as shown in Figure 22. Therebar should enter the
holesintheHearthandlieadjacenttothe12”rebarsecured
insuboor.Then llcells withapprox. 2cu.ft. Ready-Mix
Concrete.
Figure 22
12inch
rebar
Addrebarafter
fourthrow
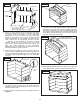
Temporarily placeLintel betweensidewalls, makingsure9)
it is ush to the front and snug at the inside. Check for
alignment.RemoveLintelandapplymortaronsurfacesto
bemated.InstallLintel.
InstallLowerRearDomeushtotherearwallsasshownin10)
Figure 23.
Figure 23
Lintel
Lower
RearDome
11) Place Lower Side Domes between Lintel and Lower
RearDometoverifyt.Thefacewiththeratingplatefaces
theinsideof therebox asshown in Figure 24. Remove
andpreparematingsurfaceswithmortar.AssembleLower
DomeSidesandcheckthatallfourtopsurfacesarelevel
witheachother.Shimifnecessary.
Figure 24
LowerDomeSides
(RatingPlatefacesinside)
12)NowinstalltheSmokeDomeTops.Alignouteredgeswith
LowerDomeSides.Checkforatnessandsquareness.
Figure 25