
User Manual

5
The size of the area
should be as shown. (Be
sure to obtain appropriate
permission.)
CAUTION:
Control may be
lost if the airplane
is more than 50 meters
from the transmitter.
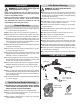
CHOOSING A DAY TO FLY
Ver y
Light
Wind
Strong
Wind
Calm weather with either no wind or wind speed of 1– 2 mph
is suitable for flying.
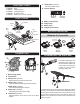
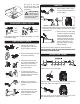
PRE-FLIGHT CHECK
1. Check for any bends or
damaged parts on the main
wing, fuselage or tail wing.
2. Be sure the propeller & spinner
are properly attached!
3. Switch the transmitter ON
and connect the battery, and
advise any people nearby.
Make sure there is no one
near the propeller.
4. In case the motor starts
rotating accidentally, have an
assistant hold the rear part of
the plane securely.
5. Check to see if the plane
responds properly to control
signals.
6. Test the range of the radio
signal. Step back about 30 ft
[10m] and check for any
unusual behavior.
About
30 ft
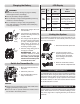
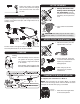
TAKEOFF
1. Before takeoff, check to see if
the plane responds properly to
control signals.
2. Apply 3/4 throttle while facing into the wind. Hold the plane
horizontally and launch straight and level with a gentle
pushing motion.
3. After launching, use the rudder
to stop the plane from banking
left or right. Climb 10 – 20º
at about half throttle. After
reaching an altitude of about
6 feet [2m], begin circling the
plane. (If the battery is not
charged properly, the plane
will not ascend).
Use the elevator stick to adjust the climb and altitude.
Put the throttle stick to the lowest position when
crashing to avoid damage.
ADJUSTING TRIMS
Adjusting trim for horizontal flight.
Take your finger off of the rudder stick and if the plane flies
to the right, adjust the rudder trim to the left side.
Take your finger off of the elevator stick and if the plane
flies upwards, adjust the elevator trim upward.