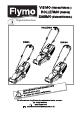
VISIMO (VM032/VM032+) ROLLERMO (RM032) EASIMO (EM032/EM032+) Original Instructions ROLLERMO VISIMO EASIMO N AT I O FORM N I T RTA N I M P O fore use rence be e refe r u t Read u f in for & reta For all customer enquiries or for replacement parts, contact:℡ 01325 300303 www.flymo.com customer.services@husqvarna.co.
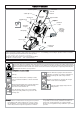
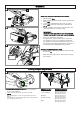
Carton Contents switchbox start/stop lever lock off button cable clip x 2 grassbox handle washer x 4 wingknob x 4 Easimo only bolt x 2 upper handle grassbox upper grassbox lower grassbox tongue electric cable with moulded on plug safety flap lower handle x 2 motor cover instruction manual deck IMPORTANT ! Please check the contents of the carton are correct BEFORE Pack is packaged underneath the deck of the product.
2. Only use the lawnmower in the manner and for the functions described in these instructions. 3. Never operate the lawnmower when you are tired, ill or under the influence of alcohol, drugs or medicine. 4. The operator or user is responsible for accidents or hazards occurring to other people or their property. Electrical 1. The British Standards Institute recommend the use of a Residual Current Circuit Device (R.C.D.) with a tripping current of not more than 30mA. Even with a R.C.D.
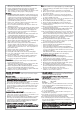
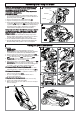
Assembly Instructions A 3 2 1 B • The Loose Parts Pack is packaged underneath the deck. 1 2 C 1 3 4 5 2 D E F1 F2 Assembly of Lower Handles to Deck 1. Place the bolt (A2) through the hole in the lower handle (A1) until the lower handle fits into the recess (A3) 2. Place the washer (B1) and the wing knob (B2) on to the bolt and tighten the wing knob. 3. Repeat on the other side. Assembly of Upper Handles to Lower Handles. 1.
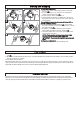
Grassbox G 1 Fitting Fully Assembled Grassbox to Lawnmower. 3 1. 2. 3. 2 H 4. J • IMPORTANT ! AFTER FITTING ENSURE NO GAP REMAINS BETWEEN THE SAFETY FLAP AND THE GRASSBOX. • • Removal is the reverse procedure. For larger areas of grass where grass collection is not required you can use your lawnmower without the grassbox. Ensure the Safety Flap is fully closed. The design of the safety flap permits the cut grass to be discharged downward behind the machine.
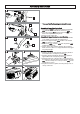
Starting and Stopping M N P Q 1 R To Start your Lawnmower 1. Form loop in mains cable and push the loop through the slot. (M) 2. To secure, position loop over the hook and pull the cable back through the slot (N). 3. Connect plug to mains and switch on. 4. Tilt the handle downwards to slightly raise the front of the lawnmower and to reduce the risk of lawn damage whilst starting. The switchbox is provided with a lock-off button (P1) to prevent accidental starting. 5.
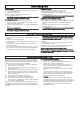
Removing and Fitting the Blade Switch off, wait until the blade has stopped rotating and disconnect from the mains electricity supply BEFORE attempting to remove or refit the blade. Always handle the blade with care - sharp edges could cause injury. USE GLOVES. Removing the Blade 1. To remove the blade bolt, hold the blade firmly with a gloved hand and with a spanner, loosen the blade bolt by turning it anti-clockwise (S). 2. Remove the blade bolt, washer and blade.(S) 3.
Fault Finding Hints Fails to Operate 1. Is the correct Starting procedure being followed? See ‘To Start your Lawnmower’ 2. Is the Power Turned On? 3. Check the fuse in the plug, if blown replace. 4. Fuse continues to blow? Immediately disconnect from the mains electricity supply and consult your local approved Service Centre. Poor Grass Collection 1. Disconnect from the mains electricity supply. 2. Clean the outside of the air intakes, the discharge chute and the underside of the deck. 3.
Environmental Information • • Awareness of the environment must be considered when disposing of ‘end-of-life’ product. If necessary, contact your local authority for disposal information. The symbol on the product or on its packaging indicates that this product may not be treated as household waste. Instead it shall be handed over to the applicable collection point for the recycling of electrical and electronic equipment.