® INSTRUCTION MANUAL TIO A M R NFO I T TA N se R nce O I M P efore u re refere b tu Read in for fu ta & re N
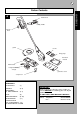
1 Carton Contents CONTENTS A handle bolt steady handle handle knob guard screws fixing plugs instruction manual wall bracket Integrated battery charger guarantee card scraper tool LIST OF INSTRUCTION MANUAL CONTENTS CONTENTS (1) SAFETY (2-4) ASSEMBLY & ADJUSTMENT (5-7) USE (8) MAINTENANCE (9-10) GUARANTEE (11) CERTIFICATE OF CONFORMITY (12) & INSIDE BACK COVER IMPORTANT ! Please check the contents of the carton are correct BEFORE assembling your new Flymo product.
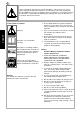
2 If not used properly this trimmer can be dangerous! This trimmer can cause serious injury to the operator and others, the warnings and safety instructions must be followed to ensure reasonable safety and efficiency in using this trimmer. The operator is responsible for following the warning and safety instructions in this manual and on the trimmer.
3 11. Do not attempt to repair the unit including the battery. Nylon line replacement and cleaning the unit are the only items suitable for user maintenance. Maintenance and storage 1. Keep all nuts, bolts and screws tight to be sure the trimmer is in safe working condition. 12. Do not insert any object into the motor area. Keep free of debris to avoid overheating. 2. Replace worn or damaged parts for safety. 3. Only use the replacement cutting line specified for this product. 4.
4 Battery Care Bench Top Re-charging 1. If over a period of time the battery quickly runs down after a full 24 hour charging period, a replacement battery is needed. The wall bracket can also be used as a "bench top" stand for re-charging your cordless trimmer. 2. There will be some charge present in the battery but to ensure maximum running time, recharge your trimmer for 24 hours before use. Winter Storage 3.
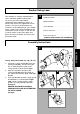
5 Product Rating Label Your product is uniquely identified by a silver and black product rating label. To ensure you have full product information when obtaining spares or advice from one of our approved service centres, or if you need to contact our customer service department, you should make a note in the space provided of the information shown in fig.B. It will also be useful to make a note of the date and place of purchase before you return your guarantee card. B Product Number . . . . . . . . . . .
6 Fitting the wall bracket • G 1 1. 2. 2 3. 4. ASSEMBLY 5. IMPORTANT ! Switch charger off at the wall socket before connecting or disconnecting the trimmer to the wall bracket. It is recommended that the wall bracket (G2) should be mounted on a smooth, vertical and internal wall which is strong enough to hold the weight of the product, in a well ventilated area between 5°C and 25°C. There are 3 holes on the wall bracket. Position the wall bracket with the two holes at the top. See Fig H.
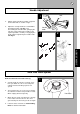
7 Handle Adjustment I 1. Attach steady handle to product using bolt and handle knob as shown in Fig I. 2. Adjust the steady handle to a comfortable operating position, see Fig J., by unscrewing the handle knob, springing the side lugs apart, moving the handle to the required position, carefully re-engaging the teeth and then tightening the handle knob. See Fig K. bolt handle knob J K ADJUSTMENT Auto Line Feed System How the automatic line feed works (L) 1.
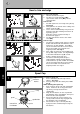
8 How to trim and edge 1 M To start your trimmer 1. Hold as illustrated in Fig M. 2. To start, press lock-off button (M1), squeeze the switch lever (M2), release lock-off button. How to trim 1. Cut with nylon line at an angle using the tip. See Fig N 2. Swing trimmer in and out of the cutting area taking small cuts (O) 3. Line is fed out automatically every time the trimmer head stops rotating and returns to operating speed. • Extra line can be fed out manually as described on page 9. 4.
9 Nylon Line To manually feed the nylon line If required, line can be fed out manually. To operate, gently pull on the line whilst at the same time alternately pressing and releasing the button, on the side of the spoolholder. See fig V. To replace nylon line. Replacement nylon line is available from most Flymo/Partner stockists. You can buy it either as spool and line complete, or as nylon line only. To replace spool and line (complete) 1. Take new spool and remove tape holding line in place. 2.
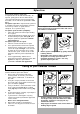
10 Fault Finding Hints & Service Recommendations MAINTENANCE Fault Finding Hints 1. Line too short Manually feed out the line. 2. Line broken inside cutting head Remove cap and re-thread line. 3. Line jammed on spool Remove cap and spool and rewind line to remove crossed loops. 4. Excess line feed Battery needs to be charged. 5. Poor performance Ensure inside of cutting head housing is clean and free from debris. 6.
11 Guarantee & Guarantee Policy If any part is found to be defective due to faulty manufacture within one year of original purchase, Flymo/Partner, through its Authorised Service Repairers will effect the repair or replacement to the customer free of charge providing: (a) The fault is reported directly to the Authorised Repairer. (b) Proof of purchase is provided. (c) The fault is not caused by misuse, neglect or faulty adjustment by the user. (d) The failure has not occurred through fair wear and tear.
12 Environmental Information Electrolux Outdoor Products are manufactured under an Environmental Management System (ISO 14001) using, where practical, components manufactured in the most environmentally responsible manner, according to company procedures, and with the potential for recycling at the end of the products’ life. • Packaging is recyclable and plastic components have been labelled (where practical) for categorised recycling.
Certificate of Conformity I, THE UNDERSIGNED P. HOWELLS OF ELECTROLUX OUTDOOR PRODUCTS, AYCLIFFE INDUSTRIAL ESTATE, NEWTON AYCLIFFE, COUNTY DURHAM DL5 6UP ENGLAND Certify that the Trimmer 1. Category . . . . . . . . . . . . . . . . . . . . . . . . . . . . . . . . . . . . . . . . . . . . . . . Electric 2. Make . . . . . . . . . . . . . . . . . . . . . . . . . . . . . . . . . . . . . . . . . . . . . . . . . . Flymo Conforms to the specifications of Directive 84/538/EEC/ Type of Cutting Device . . . . . . .
The use of eye protection is recommended to protect against objects thrown by the cutting line. Flymo Safety Glasses are available from most leading stockists GUIDE PRICE ONLY £3.49 GUIDE PRICE ONLY £3.49 Contact your nearest stockist or telephone (01325) 300303 for more details Electrolux Outdoor Products Aycliffe Industrial Estate NEWTON AYCLIFFE Co.