® FlukeView Forms Documenting Software Users Manual September 2000, Rev. 4, 2/05 © 2002, 2003, 2005 Fluke Corporation. All rights reserved. All product names are trademarks of their respective companies.
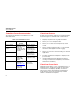
Table of Contents Title Introduction..................................................................................................................... Contacting Fluke ............................................................................................................ FlukeView Forms Documentation................................................................................... FlukeView Features....................................................................................................
FlukeView Forms Users Manual Interactive Logging.................................................................................................... Event Logging ...................................................................................................... Setting Up Your Logging Session......................................................................... Viewing the Status of a Logging Session ............................................................. Single-Reading Copy to Form ...........
Contents (continued) Single-Reading Copy to Form............................................................................... Managing the Database ................................................................................................. Opening Databases ................................................................................................... Creating a New Database.......................................................................................... Backup Procedures ..............
FlukeView Forms Users Manual Fluke Corporation FlukeView® Forms License Agreement BY USING THIS SOFTWARE PRODUCT IN ANY MANNER, YOU ARE AGREEING TO ACCEPT THE FOLLOWING TERMS AND CONDITIONS.
FlukeView Forms Documenting Software Introduction Contacting Fluke FlukeView Forms Documenting Software lets you transfer data from a supported digital multimeter directly to forms on your computer. This automates your troubleshooting or recording process, reduces the possibility for manual error and allows you to collect, organize and display meter data in a format that meets your needs.
FlukeView Forms Users Manual FlukeView Forms Documentation FlukeView Features The following documentation is available for use with FlukeView Forms. Acquires and documents readings from supported digital meters through IR or standard serial communications. Table 1.
Documenting Software Installation Installation Overview of FlukeView Forms This section describes how to install FlukeView Forms and FlukeView Forms Designer. Also, follow these instructions to upgrade from an older version of the software. The Users Manual provides an overview of what you need to know to use FlukeView Forms. This includes: System Requirements Operating System: Microsoft Windows 95, 98 or ME, Windows NT 4.0, Windows 2000, or Windows XP.
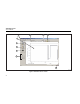
FlukeView Forms Users Manual 2 3 4 5 1 6 7 8 9 10 zk01f.eps Figure 1.
Documenting Software Overview of FlukeView Forms Table 2. Graphic User Interface Components No. Description A Active form template. Displays meter data and user-entered data. B FlukeView Forms menu. C Select a form template drop-down list. Lists all form templates available in the open database. Identifies the active template currently being displayed. D Saved forms drop-down list. Lists all forms you have saved with the active template.
FlukeView Forms Users Manual Note Starting FlukeView Forms If you open a new blank form template, FlukeView Forms asks if you want to save any changes you have made to the current active form. To start FlukeView Forms: 1. From the Windows taskbar, select Start, Programs, Fluke, then FlukeView Forms. 2. Click the FlukeView Forms menu item. Selecting a Form Template FlukeView Forms templates are designed to display data in different ways.
Documenting Software Getting Data from the Meter to the PC How Your Meter Communicates Data Connecting the Serial Cable to a PC The following table shows how certain Fluke meters communicate data to the PC, as well as the type of data readings the meters support. See Logged Readings and Display Readings later in this manual for additional details about types of readings. 1. Attach the IR cable or standard serial cable to your PC. 2. Attach the other end of the cable to the meter.
FlukeView Forms Users Manual Logged Readings and Display Readings FlukeView Forms deals with two types of meter data, logged readings and display readings. Refer to Table 3 to determine the type of readings generated by your meter(s). Logged readings are taken during a logging session. There are two ways to generate logged readings: • During interactive logging between a meter and a PC running FlukeView Forms. • Some meters support logging directly to meter memory.
Documenting Software Getting Data from the Meter to the PC To upload data: 5. 1. Start FlukeView Forms. 2. Select the form template you want to use by opening the File menu and selecting New Blank Form. Highlight the form template in the New Blank Form dialog box and click OK. On the Meter menu, select Get Meter Data to upload the meter data to the active form. The Get Meter Data dialog box appears. In some cases, this step is unnecessary.
FlukeView Forms Users Manual To begin interactive logging: The Setup, Schedule and Status tabs of the Logging Window display settings for and provide information about the logging session. Use them to: 1. Connect the meter to the PC. 2. Select the form template you want to use by opening the File menu and selecting New Blank Form. Highlight the form template in the New Blank Form dialog box and click OK. • Change the default logging settings under Setup.
Documenting Software Getting Data from the Meter to the PC INTERVAL EVENTS Hour: minute 14:00 14:10 14:20 14:30 14:40 5V LOGGED READINGS 0V Stable Unstable INPUT EVENTS 1 2 3 4 5 zk02f.eps Figure 2.
FlukeView Forms Users Manual Event Logging During interactive logging, FlukeView Forms compresses the input being measured by the meter into a series of events. Each event is represented by a duration, starting time, ending time, and the highest, lowest and average values detected during the event. When you start logging, the meter readings are monitored by FlukeView Forms and are classified by event type.
Documenting Software Getting Data from the Meter to the PC Input events are useful for detecting anomalies in a group of data, when monitoring a process or when troubleshooting a problem. Interval events are useful if the values you record are fairly stable in nature and your main purpose is documentation for record keeping. If the values you record are fairly stable, but monitoring variance from the norm is critical, recording both interval events and input events can be a valuable troubleshooting tool.
FlukeView Forms Users Manual Click on the << button if you want to change the example input data to approximate the inputs you are expecting to measure. Changing the Input Event Settings Changing the Logging Interval Changing the input event settings allows you to specify what changes in the input are significant enough to begin a new input event. To change the logging interval, open the Logging Window, select the Setup tab and make changes in the Interval section.
Documenting Software Getting Data from the Meter to the PC If the meter supports internal event logging, you can choose to have the meter perform the input event detection. When the meter is performing the input event detection, the input change detection is noticeably faster. Note With the exception of the Fluke 789: If your meter supports the display of two readings at once, and both are being displayed, you need to select whether the input event thresholds are applied to the primary or secondary display.
FlukeView Forms Users Manual The drop-down list in the top left corner of the virtual meter window gives you several options for viewing data. The reading appears at the bottom of any display reading table on the form, or in a testpoint reading form item. • The Primary/Secondary Readings option gives you a small screen that reflects the meter display. Data from Multiple Meters on a Single Form • The Meter Display option simply gives you a largerscreen view of this data.
Documenting Software Using Forms To display multiple data groups on a form, the form template you are using must be enabled for multiple data groups. Otherwise, the form can only contain data from a single meter. Use FlukeView Forms Designer to enable data groups on a form template. See the online Tutorial #4, “Multiple Data Groups,” for step-by-step instructions on how to use data groups. Note Multiple data groups are not supported in FlukeView Forms Basic form templates.
FlukeView Forms Users Manual Printing a Form To print a form: Saved forms are identified by the form template and the date and time they were first saved. You can also enter a 30-character remark to help identify the form. The remark is displayed after the date and time in the Saved forms list at the top of your screen. See “Finding and Opening Saved Forms” in this manual for more information. 1. On the File menu, select Print. You can also use the Print button. 2.
Documenting Software Finding and Opening Saved Forms Note 1. User data must be re-entered when you move existing data from one form template to another. From the menu, select Tools, then Select Readings to display the Select Readings tool. 2. The Select Readings dialog box appears. Click Help for instructions on deleting, reordering, or combining readings. Display Selected Readings Sometimes, you might not want to display or save all of the readings you have taken from the meter.
FlukeView Forms Users Manual It is important that you select the template in which your data was originally saved. The Saved forms drop-down list only displays those forms that were saved in the selected form template. If you do not remember the template in which you saved the form, search for it using the menu. From the menu, select File, then Open Saved Form. You can also use the Find button to locate the saved form.
Documenting Software Virtual Meter Virtual Meter Primary/Secondary Readings The virtual meter is useful if you want to view meter data before adding it to a form. It allows you to preview uploaded data, to export and copy data, and to copy a single reading to a form. Provides a compact, virtual representation of readings as they occur on your meter’s display. If your meter displays both primary and secondary readings, the virtual meter shows both readings.
FlukeView Forms Users Manual Export Data Clearing Data from Meter Memory You can export uploaded meter data as a .csv file by doing the following: You can use FlukeView Forms to clear data from the meter’s memory. 1. Transfer data from meter memory to FlukeView Forms. 2. To open the virtual meter, click the Meter button on the right-hand side of your display. 3. Select the Memory view. 4. Click on the Export button. 5. Assign a file name and click Save.
Documenting Software Managing the Database Managing the Database By default, FlukeView Forms databases have the file name extension .fdb. FlukeView Forms stores all meter data, user data and forms in FlukeView Forms databases. Creating a New Database You can change the active database and create new databases in FlukeView Forms and FlukeView Forms Designer. You should create new databases as your database grows larger.
FlukeView Forms Users Manual Note Copying a Form To Another Database FlukeView Forms Designer is not included in the FlukeView Forms Basic product. You can copy a saved form, including all of the meter data and user data stored with it, to another database. 1. Open FlukeView Forms, and view the saved form you wish to copy. 2. On the menu, select File, then Export Form. 3.
Documenting Software Altering Form Templates Clearing Data from Meter Memory Changing Meter Settings Use FlukeView Forms to clear data from meter memory. You can use FlukeView Forms to change some meter settings, including synchronizing the clock, internal logging settings and other meter functions that are specific to the type of meter. On meters that allow you to save several types of meter data to meter memory, FlukeView Forms prompts you to select which type to clear.
FlukeView Forms Users Manual Altering an Existing Template 1. Open FlukeView Forms Designer. 2. Open an existing form template. 3. Enable or Disable data groups by selecting Layout, then Data Groups. Click Help for detailed instructions. 4. Click on any form item, then click and drag its border to move it to a new location. 5. Add new form items from the menu by selecting Edit, then Insert Form Item. Highlight the form item name and click Insert. 6.
Documenting Software Altering Form Templates Creating a New Form Template 1. Open FlukeView Forms Designer. The screen should be blank. If not, on the menu, select File, then New. 2. Enable or Disable data groups by selecting Layout, then Data Groups. Click Help for detailed instructions. 3. Add new form items from the menu by selecting Edit, then Insert Form Item. Highlight the form item name and click Insert. 4. Move the form item to its proper location on the form. 5.
FlukeView Forms Users Manual the logged readings graph. Can display input event data, interval event data, or both. Logging Summary Displays the following information about a logging session on the form: • Logging session information: start, stop, and elapsed time; interval length; number of readings; scaling factor; and other meter-specific data. • Summary information: the maximum, average, and minimum logged readings.
Documenting Software Altering Form Templates Meter ID and Date Form Items Date Time Stamp The time stamp is automatically updated to your specifications the first time a form is saved, when meter data is received, or when the form is modified. Meter Identification Displays the serial and/or model number of the meter that was used to transfer the meter data. User Data Form Items Memo Provides a space (up to a maximum of 64,000 characters and 1000 lines) for adding user comments and notes.
FlukeView Forms Users Manual Bitmap A static graphic image, such as a company logo. Bitmap image formats include: • Graphics Interchange Format (.gif) files • JPEG File Interchange Format (.jpg) files • Windows Bitmap (.bmp) files Setting the Comm Port To change the communications port that FlukeView Forms uses: 1. On the Tools menu, select Options. The Options dialog box appears. 2. Click the Communications tab. Label This item displays static text on the form. 3.