
User's Manual

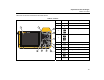
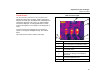
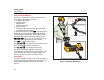
Table Of Contents
- TiX520, TiX560 Users Manual
- Introduction
- How to Contact Fluke
- Safety Information
- Accessories
- Before You Start
- Image Capture
- Micro SD Memory Card
- Temperature Measurement
- SmartView Software
- Menus
- Remote Control
- Maintenance
- General Specifications
- Detailed Specifications

TiX520, TiX560
Users Manual
16
How to Use the Menus
The menus, coupled with the three function button and
arrow buttons, are the access point for:
• Thermal image display
• Camera features
• Measurement
• Advanced functions
• Memory review
• Settings for date, time, language, units, file format
• Information about the Imager
To open the primary menu, push . The primary menu
shows five secondary menus for Measurement, Image,
Camera, Memory, and Settings. The text labels on the
right-hand edge of the touchscreen correspond to the
, , buttons. You can use the buttons or the
touch screen interchangeably for these functions.
Push to open the primary menu.
Push
to cycle through the secondary menus.
Each secondary menu lists an options menu.
Push
to cycle through the options.
The primary, secondary, and option menus close
10 seconds after the last push of a function button. The
option selection menu stays open until you make the
selection, go up a menu level, or cancel the action.
Neck Strap
The neck strap makes it easy to carry the Imager with you
on the job and supports extended use of the Imager. It is
simple to attach and adjust without any tools. See
Figure 3.
hwj003.eps
Figure 3. Adjustable Neck Strap