
User manual

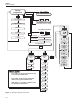
Table Of Contents
- Table of Contents
- 1 Before You Start 1
- 2 Introduction 7
- 3 Specifications and Environment Conditions 9
- 4 Quick Start 13
- 5 Parts and Controls 15
- 6 General Operation 17
- 7 Controller Operation 19
- 7.1 Target Temperature 19
- 7.2 Temperature Set-point 19
- 7.3 Temperature Scale Units 21
- 7.4 Scan 22
- 7.5 Set-point Resistance 23
- 7.6 Temperature Scale Units 23
- 7.7 Secondary Menu 23
- 7.8 Heater Power 23
- 7.9 Proportional Band 24
- 7.10 Controller Configuration 25
- 7.11 Operating Parameters 25
- 7.12 Serial Interface Parameters 26
- 7.13 Calibration Parameters 27
- 8 Digital Communication Interface 29
- 9 Calibration Procedure 35
- 10 Maintenance 39
- 11 Troubleshooting 41
- Figures
- Tables

6 General Operation
6.1 Changing Display Units
The 9133 can display temperature in Celsius or Fahrenheit. The temperature
units are shipped from the factory set to Celsius. There are two ways to
change to Fahrenheit or back to Celsius as described below.
1. Press the “SET” and “UP” buttons simultaneously. The units are
changed.
Or
1. Press the “SET” button three times from the temperature display to
show Un =C
2. Press the “UP” or “DOWN” button to change units.
6.2 Switching to 230 V Operation
The 9133 is switchable from 115 VAC to 230 VAC 50/60 Hz. To change from
115 VAC to 230 VAC follow the steps below.
1. Unplug the instrument.
2. With a small straight slot screwdriver remove the fuse holder located
on the rear panel.
3. Replace the two 3 A 250 V fuses with two 1.6 AT 250 V fuses.
4. Replace the fuse holder with the “~” in the display window.
Note: If “~” is not displayed in the window, the unit will not heat or cool.
6.3 Ice Buildup/Purge
To prevent ice buildup on the target at temperatures below 5°C, use the tar
-
get cover and/or a dry gas purge. When taking measurements using the tar
-
get cover, place the target cover in place and set the set-point temperature
to the desired temperature, remove the target cover, take a sample, and re
-
place the cover. When ice forms on the target, change the unit set-point
higher than 5°C to melt the excess ice. When the ice melts pat the excess
water off with a clean dry cloth. Do not wipe the front plate. If a clean dry
cloth is not available, change the set-point to 100°C or higher, to evaporate
the excess water.
When using a dry gas purge, the instrument will not reach minimum tem
-
perature. An example of a gas purge is dry nitrogen connected through a
1/8” inner diameter tube to the purge fitting located at the front bottom of
the target. The nitrogen gas is controlled to fill the chamber in front of the
17
6
General Operation