
Installation Instructions
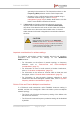
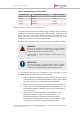
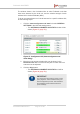
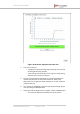
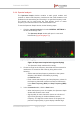

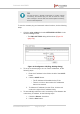
Table Of Contents
- Fluidmesh 4200 FIBER
- Table of Contents
- 1. HAZARDOUS CONDITION WARNINGS
- 2. Reporting mistakes and recommending improvements
- 3. Getting Started
- 4. Hardware installation
- 4.1. Fluidmesh Hardware Installation
- 4.2. Connecting the Fluidmesh Fluidmesh 4200 FIBER to a network and antennas
- 5. Using the Fluidmesh Partner Portal
- 6. Device configuration using the configurator interface
- 6.1. Software and hardware prerequisites
- 6.2. Accessing the Fluidmesh 4200 FIBER for device configuration
- 6.3. Switching between offline and online modes
- 6.4. General settings
- 6.5. Network control
- 6.6. Advanced settings
- 6.6.1. Advanced radio settings
- 6.6.2. SFP settings
- 6.6.3. Static routes
- 6.6.4. Whitelists and Blacklists
- 6.6.5. Multicast
- 6.6.6. SNMP configuration
- 6.6.7. Wireless access point configuration
- 6.6.8. RADIUS configuration
- 6.6.9. NTP Configuration
- 6.6.10. L2TP configuration
- 6.6.11. VLAN settings
- 6.6.12. Fluidity settings
- 6.6.13. Miscellaneous settings
- 6.7. Management settings
- 6.7.1. View Mode settings
- 6.7.2. Changing the Administrator username and password
- 6.7.3. Overwriting and upgrading the unit firmware
- 6.7.4. Plug-In management
- 6.7.5. The device status view
- 6.7.6. Saving and restoring the unit settings
- 6.7.7. Resetting the unit to factory defaults
- 6.7.8. Logging out
- 6.7.9. Viewing the end-user license agreement
- 7. Software Plug-Ins
- 8. Troubleshooting
- 9. Electrical power requirements
- 10. Heat radiation data
- 11. Federal Communications Commission (FCC) radio interference statement
- 12. Notices and copyright
- 13. Fluidmesh end-user license agreement
- 13.1. Preamble
- 13.2. Notice
- 13.3. Definitions
- 13.4. License grant
- 13.5. Uses and restrictions on use
- 13.6. Open-source software
- 13.7. Termination
- 13.8. Feedback
- 13.9. Consent to use of data
- 13.10. Warranty disclaimer
- 13.11. Limitation of liability
- 13.12. Exclusion of liability for emergency services
- 13.13. Export control
- 13.14. General
- 14. Contact us

NOTE
If a unit is configured as a Slave, you can still enable manual
frequency selection by disabling the Autoscan setting on the
ADVANCED RADIO SETTINGS page. Refer to “Advanced
radio settings” (page 97) for more information.
Co-location considerations
To avoid radio interference caused by unit co-location, set the frequencies
of co-located transceivers as far apart as practically possible.
Before a network is deployed, frequency allocations for every unit-to-unit
link must be planned in advance. A safe method is to use the narrowest
channel width that can realistically support the needed amount of data
throughput whilst separating the individual channels as much as possible.
Even if two radios are not transmitting on the same channel, their side
lobes may still cause them to interfere with each other. It is good practice
to space the radios as far apart as practically possible in the vertical
plane, with a minimum of 3ft/1m and an ideal distance of 5ft/1.5m
between them.
Mounting radio transceiver units back-to-back or side by side may cause
co-location interference that will degrade performance across your
network.
Channel width considerations
Whenever practically possible, setting the unit to operate at a narrower
channel width can help reduce overall network interference by increasing
the number of available channels.
WARNING
Before changing the channel width value, make sure that the
overall frequency range you will be using is legal for your
territory. Changing the operating channel width may violate the
local telecommunication authority’s regulations, lead to illegal
wireless operation, and have other harmful consequences.
The following table correlates different channel widths with their
theoretical maximum data rates and achievable throughput, assuming that
the unit is being used as part of a point-to-point configuration.
IMPORTANT
The following table shows theoretical values under ideal
conditions. Actual throughput may vary depending on
environmental and other conditions.
Fluidmesh 4200 FIBER
© Fluidmesh Networks LLC Page 72 of 180