
Installation Instructions
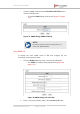
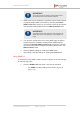
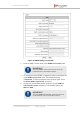

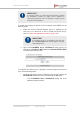
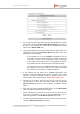
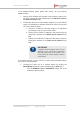
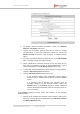
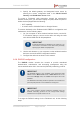
Table Of Contents
- Fluidmesh 4200 FIBER
- Table of Contents
- 1. HAZARDOUS CONDITION WARNINGS
- 2. Reporting mistakes and recommending improvements
- 3. Getting Started
- 4. Hardware installation
- 4.1. Fluidmesh Hardware Installation
- 4.2. Connecting the Fluidmesh Fluidmesh 4200 FIBER to a network and antennas
- 5. Using the Fluidmesh Partner Portal
- 6. Device configuration using the configurator interface
- 6.1. Software and hardware prerequisites
- 6.2. Accessing the Fluidmesh 4200 FIBER for device configuration
- 6.3. Switching between offline and online modes
- 6.4. General settings
- 6.5. Network control
- 6.6. Advanced settings
- 6.6.1. Advanced radio settings
- 6.6.2. SFP settings
- 6.6.3. Static routes
- 6.6.4. Whitelists and Blacklists
- 6.6.5. Multicast
- 6.6.6. SNMP configuration
- 6.6.7. Wireless access point configuration
- 6.6.8. RADIUS configuration
- 6.6.9. NTP Configuration
- 6.6.10. L2TP configuration
- 6.6.11. VLAN settings
- 6.6.12. Fluidity settings
- 6.6.13. Miscellaneous settings
- 6.7. Management settings
- 6.7.1. View Mode settings
- 6.7.2. Changing the Administrator username and password
- 6.7.3. Overwriting and upgrading the unit firmware
- 6.7.4. Plug-In management
- 6.7.5. The device status view
- 6.7.6. Saving and restoring the unit settings
- 6.7.7. Resetting the unit to factory defaults
- 6.7.8. Logging out
- 6.7.9. Viewing the end-user license agreement
- 7. Software Plug-Ins
- 8. Troubleshooting
- 9. Electrical power requirements
- 10. Heat radiation data
- 11. Federal Communications Commission (FCC) radio interference statement
- 12. Notices and copyright
- 13. Fluidmesh end-user license agreement
- 13.1. Preamble
- 13.2. Notice
- 13.3. Definitions
- 13.4. License grant
- 13.5. Uses and restrictions on use
- 13.6. Open-source software
- 13.7. Termination
- 13.8. Feedback
- 13.9. Consent to use of data
- 13.10. Warranty disclaimer
- 13.11. Limitation of liability
- 13.12. Exclusion of liability for emergency services
- 13.13. Export control
- 13.14. General
- 14. Contact us

5. If needed, choose the correct encryption protocol from the SNMP
v3 encryption: drop-down. The available options are No
Encryption, DES (Data Encryption Standard) and AES
(Advanced Encryption Standard).
IMPORTANT
The same encryption protocol must be set for all
Fluidmesh units in the wireless network.
6. To change the current encryption passphrase, enter a new
passphrase in the SNMP v3 encryption passphrase: field. The
default encryption passphrase is fluidmesh. To show the
passphrase as it is being typed, check the Show SNMP v3
encryption passphrase: check-box.
7. SNMP traps can be enabled for significant system-related events.
If needed, enable SNMP event traps by checking the Enable
SNMP event trap: check-box, and enter the name of the network
management station (NMS) host in the NMS hostname: field.
IMPORTANT
The NMS host to which traps are sent must have an
SNMP agent configured to collect v2c traps.
8. You can also configure the unit to send SNMP traps at defined
periodic intervals. If needed, enable periodic SNMP traps by
checking the Enable SNMP periodic trap: check-box, and enter
the name of the network management station (NMS) host in the
NMS hostname: field.
9. Save the SNMP settings by clicking the Save button.
Alternatively, clear the settings by clicking the Reset button.
6.6.7. Wireless access point configuration
All 1200 VOLO, 3200-series and 4200-series radio transceivers equipped
with firmware version 6.5 and above have a built-in wireless access point
(AP).
This wireless AP is intended for use by the network's service and
maintenance personnel. If the AP is enabled, you can easily connect to
the transceiver unit from a short distance aw using a laptop computer or
any other Wi-Fi-enabled device.
Note that the radio unit can be configured as a wireless access point (AP)
or as a wireless station (STA).
Fluidmesh 4200 FIBER
© Fluidmesh Networks LLC Page 114 of 180