
Install Instructions
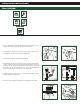

Size: 8.5" x 11"
Job #: FLUI 130606
File Name: 130606_507C_InstructionSheet.ai
Printing & Finishing:
Colors: CMYK
Printout Size
100%
Updates: hd111810,hd120110,hd120110,hd120610,
hd120810
This printout is for indicating
color breaks only.
Do not use for color matching.
Do not measure for accuracy.
Revision: 05
Time:
1017AM
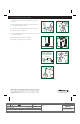
STEP 7 STEP 8
STEP 9 STEP 10
OVERFLOW
PIPE
CAP
REFILL TUBE
NIPPLE
NOTE: Flow from refill tube must be
positioned just above the overflow
pipe. Do not insert refill tube into
overflow pipe. This will siphon water
down overflow pipe causing valve to
turn on and off, trying to keep tank full.
STEP 11
STEP 1
STEP 12
INSTALLATION INSTRUCTIONS
30800 Rancho Viejo Road
San Juan Capistrano, CA 92675 U.S.A.
www.fixthistoilet.com
®
7. Place tank back on bowl so that tank-to-bowl gasket fits evenly. Level tank
and bowl.
8. Reconnect tank to bowl with bolts, washers and nuts. Tighten bolts evenly;
DO NOT OVERTIGHTEN or bowl may crack.
9. Connect flapper chain. Allow slight slack when flapper is in closed position.
10. Attach existing refill tube to overflow pipe.
11. If you have a Fluidmaster Fill Valve, remove overflow pipe ring. Then use cap
to attach directly to refill tube.
12. Reconnect water supply line to bottom of toilet fill valve.
13. Turn on water supply, check for leaks, then check flush.
© 2011 Fluidmaster, Inc. All rights reserved. This document is not a substitute for the product
instructions, which may be found at www.fluidmaster.com. Fluidmaster, Inc. shall not be
liable for any damages resulting from failure to install or maintain the product in accordance
with the product instructions, from abuse or misuse of the product, from use of
non-Fluidmaster, Inc. parts, or from overtightening. Do not use in-tank drop-in toilet bowl
cleaners containing bleach or chlorine.