
Install Instructions

Size: 8.5" x 11"
Job #: FLUI 130606
File Name: 130606_400C_InstructionSheet.ai
Printing & Finishing:
Colors: CMYK
Printout Size
100%
Updates: hd111710,hd12.01/02.10,hd120810
This printout is for indicating
color breaks only.
Do not use for color matching.
Do not measure for accuracy.
Revision: 04
Time:
1035AM
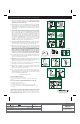
NOTE: Flow from REFILL TUBE
must be positioned just above
the OVERFLOW PIPE.
OVERFLOW
PIPE
ANGLE
ADAPTER
REFILL TUBE
NIPPLE
Do not insert REFILL TUBE down into
OVERFLOW PIPE below water level.
This will siphon water down the
OVERFLOW PIPE, which causes the
valve to turn on and off as it tries to
keep the tank full.
STEP 17
STEP 9
STEP 10
+
ADAPTER
RING
STEP 11
®
STEP 12
STEP 13
If the ANGLE ADAPTER cannot be
used, you may need the Model 599
Refill Clamp (not included).
Tilt/Flush Valve
Overflows
Built-in
China Overflows
599
CLAMP
STEP 14
LIFT
ARM
FIRST
STEP 15
STEP 16
STEP 18
"IN"
"OUT"
INSTALLATION WITH FLUSH ‘N’ SPARKLE
TOILET BOWL CLEANING SYSTEM
DIAGRAM 1
INSTALLATION INSTRUCTIONS (continued)
9. With correct WASHERS in place (see Step 8), tighten COUPLING NUT.
Hand-tighten only. DO NOT OVERTIGHTEN. CAUTION: DO NOT USE CONE
WASHER WITH PLASTIC SUPPLY LINE.
10. Clean drain with a soft cloth. Snap ADAPTER RING away from FLAPPER.
Align FLAPPER over mounting ears located on base of OVERFLOW PIPE.
Center FLAPPER over drain opening. Snap to mounting ears by pushing down
on the rigid frame near mounting ears. FLAPPER should open and close
without binding.
11. ADAPTER RING FOR 1" OVERFLOW PIPES WITHOUT MOUNTING EARS.
If there are no mounting ears on base of OVERFLOW PIPE, install ADAPTER
RING: 1) Position ADAPTER over top of OVERFLOW PIPE and press down
until it expands and slips over the outside of the OVERFLOW PIPE. If the
ADAPTER will not slide down OVERFLOW PIPE, remove spring, slip
ADAPTER around the PIPE and replace spring; 2) Slide ADAPTER down until
it contacts base of OVERFLOW PIPE. Position spring clip opposite the drain
seat. NOTE: If OVERFLOW PIPE is brass, use steel wool or wet/dry
sandpaper to remove excess scale from PIPE prior to installation. If
OVERFLOW PIPE is larger than 1", Model 555C can be used.
12. If you have a Fluidmaster bowl cleaning system, re-attach tube (“IN”) to
FILL VALVE NIPPLE (see Diagram 1). Be sure toilet tank flushing components
move freely (if you don’t have a cleaning system, continue to Step 13).
13. Remove and discard overflow pipe cap if present. Attach one end of black
REFILL TUBE to ANGLE ADAPTER and the other end to NIPPLE located
near top of VALVE. Attach ANGLE ADAPTER to OVERFLOW PIPE. Trim
REFILL TUBE as necessary to prevent kinking. NOTE: Flow from REFILL
TUBE must be positioned just above the OVERFLOW PIPE. Do not insert
REFILL TUBE down into OVERFLOW PIPE below water level. This will
siphon water down the OVERFLOW PIPE, which causes the VALVE to
turn on and off as it tries to keep the tank full. If the ANGLE ADAPTER
cannot be used, you may need the Model 599 Refill Clamp (not included).
14. Connect FLAPPER CHAIN to hole in TANK LEVER arm that provides the best
lift. CHAIN should have slight slack when FLAPPER is in closed position.
Replace lid. Check lift action for proper flush.
15. IMPORTANT: Always clear sand and rust from system. Make sure water
supply is shut off. Remove VALVE TOP by lifting arm and rotating TOP and
ARM 1/8 turn counterclockwise, pressing down slightly on cap.
16. While holding a container over the uncapped VALVE to prevent splashing, turn
water supply on and off a few times. Leave water supply off.
17. Replace TOP by engaging lugs and rotating 1/8 turn clockwise. MAKE
CERTAIN TOP IS TURNED TO THE LOCKED POSITION. VALVE may not
turn on if TOP is not fully to the locked position.
18. Turn on water supply. Submerge the FLOAT CUP under the water for 30
seconds. Adjust the water to desired level by turning WATER LEVEL
ADJUSTMENT ROD and moving FLOAT CUP up or down. Water should end
up 1/2" to 1" below top of OVERFLOW PIPE.
TROUBLESHOOTING
IF FILL VALVE WON'T TURN OFF,
• There may be debris at seal – repeat Steps 15-17.
• The seal inside the VALVE TOP may be damaged – replace with genuine Fluidmaster
242 seal.
IF FILL VALVE TURNS OFF AND ON DURING PERIODS OF NON-USE,
• There may be a leak at the FLAPPER.
• The FLAPPER is misaligned – repeat Step 10.
• The seat is corroded or damaged – replace with Flusher Fixer Kit, Model 555C.
• The end of the REFILL TUBE is inserted into OVERFLOW PIPE below water level in tank
(See Step 13).
30800 Rancho Viejo Road
San Juan Capistrano, CA 92675 U.S.A.
www.fixthistoilet.com
®
© 2011 Fluidmaster, Inc. All rights reserved. This document is not a substitute for the product
instructions, which may be found at www.fluidmaster.com. Fluidmaster, Inc. shall not be
liable for any damages resulting from failure to install or maintain the product in accordance
with the product instructions, from abuse or misuse of the product, from use of
non-Fluidmaster, Inc. parts, or from overtightening. Do not use in-tank drop-in toilet bowl
cleaners containing bleach or chlorine.