
Installation Guide


A
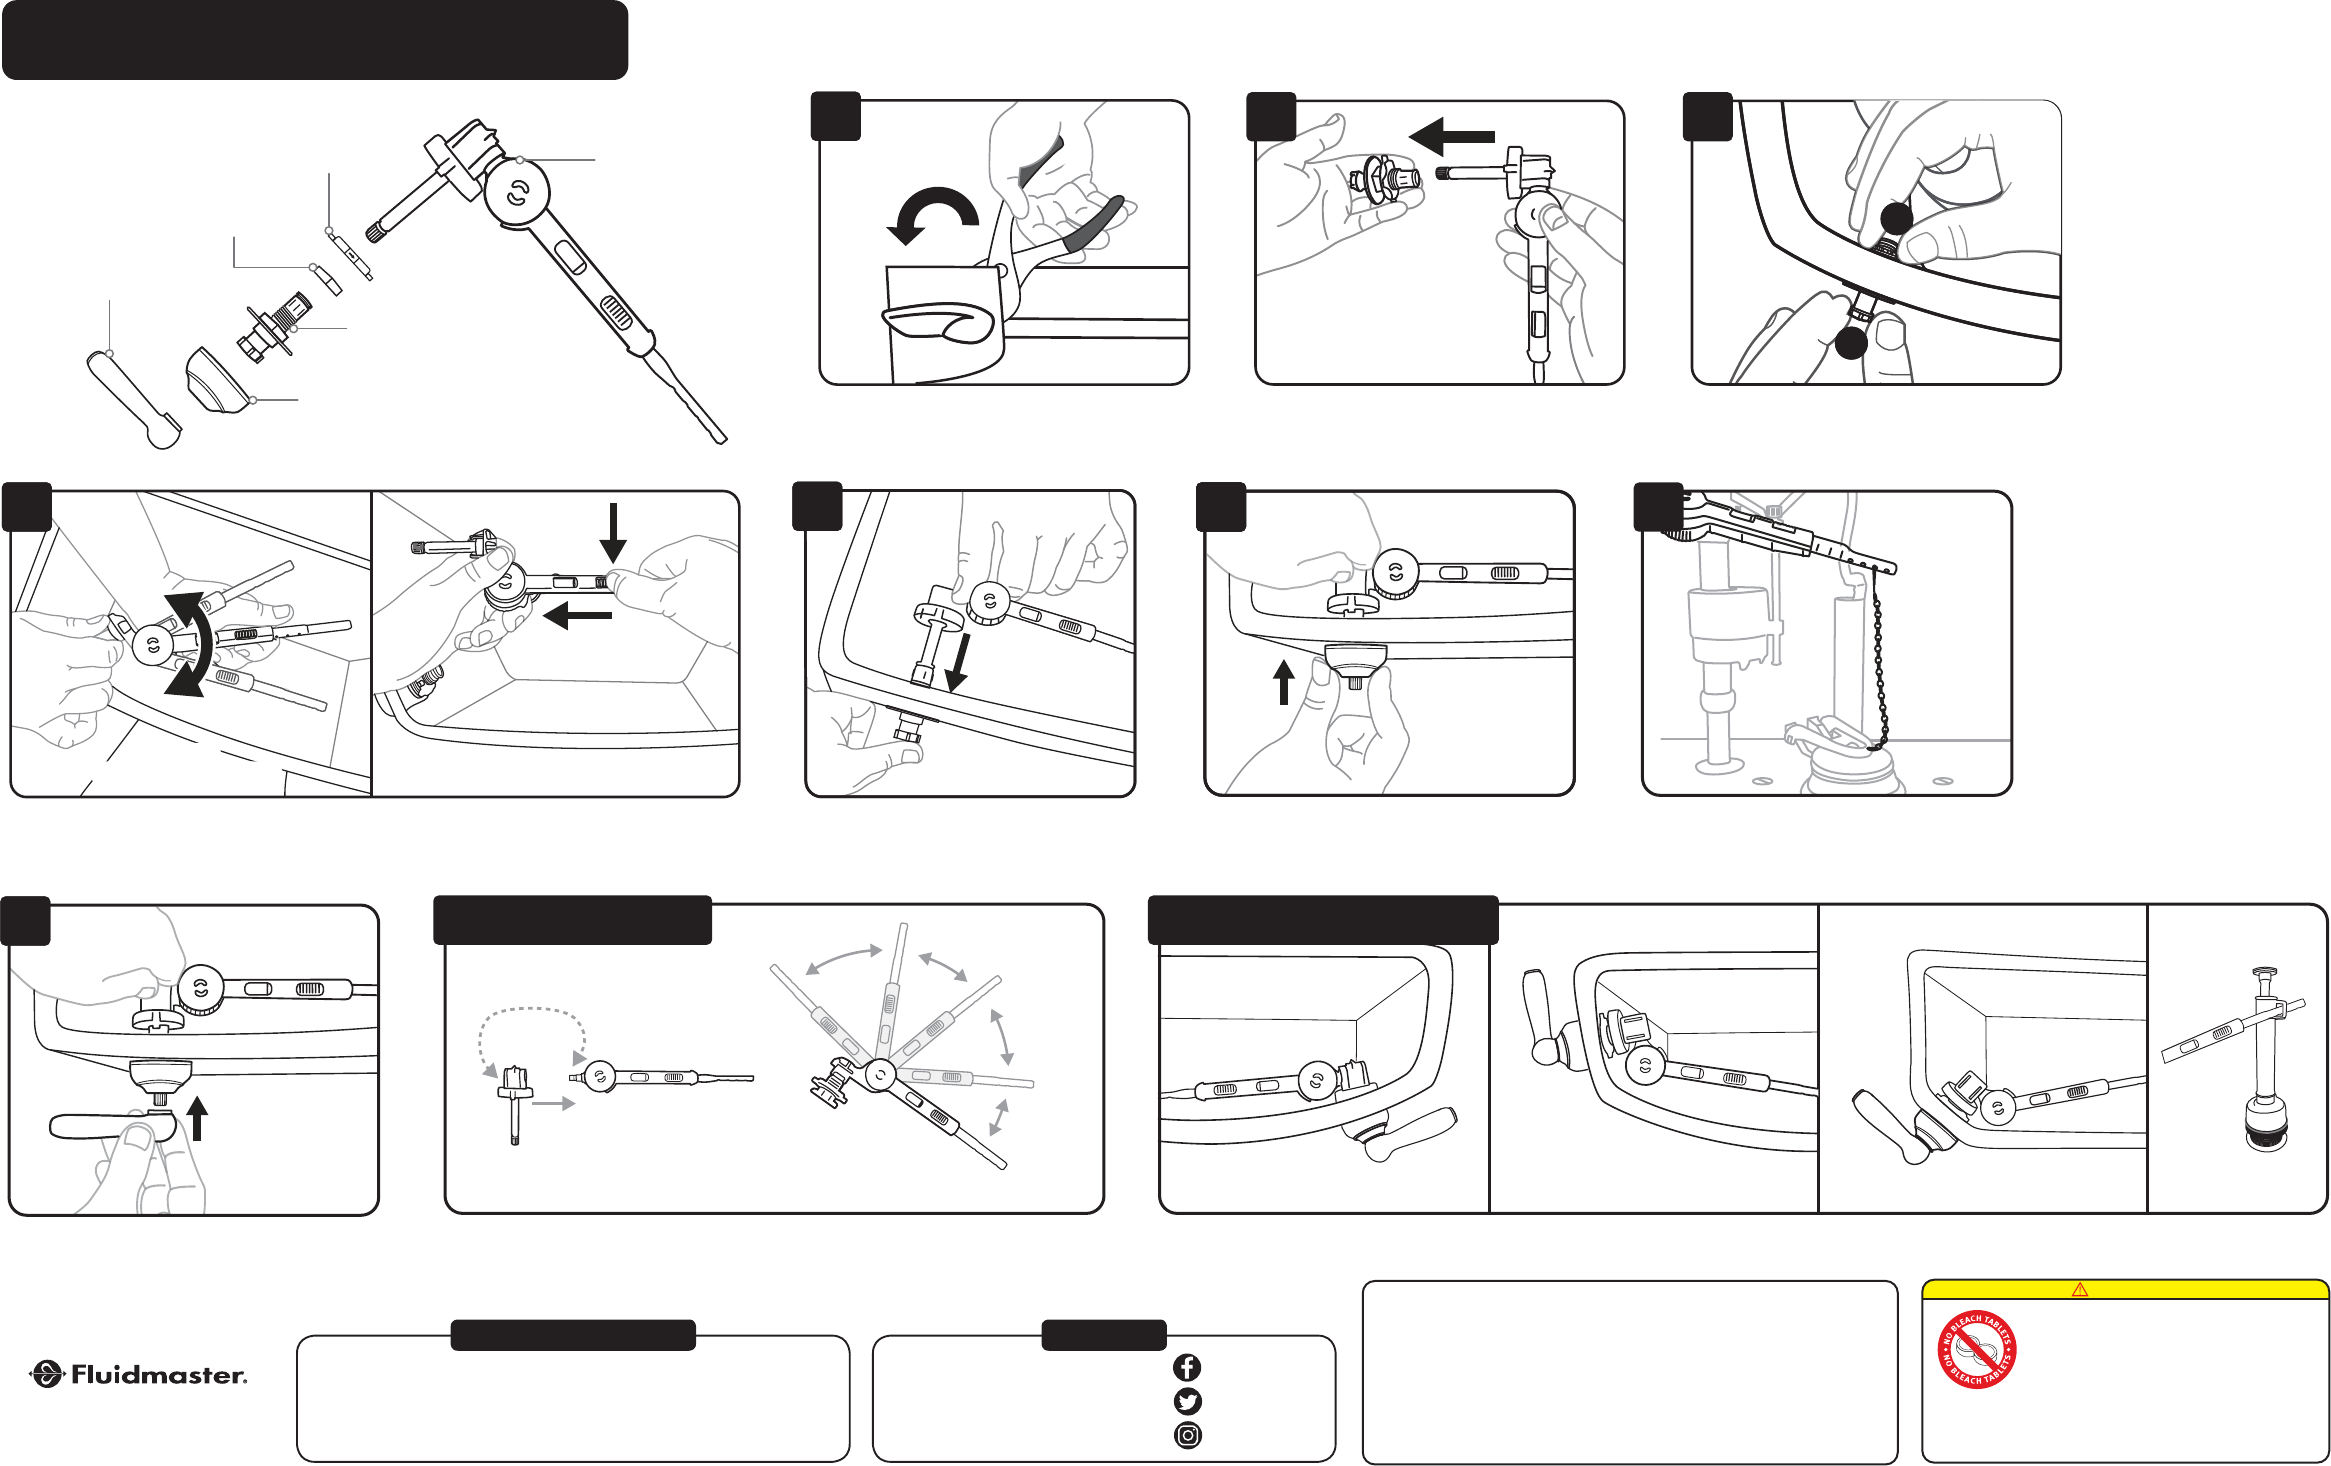
B
Remove old lever.
FLUIDMASTER
®
PERFECT FIT
TM
TANK LEVER
PART# 6-1095, Grev. 3, 05/19
SLIDE Lever mount (A) from arm (C).
Unthread locknut (B) (reverse thread).
LIMITED FIVE-YEAR EXPRESS WARRANTY
Subject to the “Exclusions” set forth below, Fluidmaster Inc. promises to the consumer to repair, or at the option of Fluidmaster Inc. to replace
any part of this plumbing product which proves to be defective in workmanship or materials under normal use for five years from the date of
purchase. All costs of removal, transportation and reinstallation to obtain warranty service shall be paid by the consumer. During this “Limited
Five Year Express Warranty,” Fluidmaster Inc. will provide, subject to the “Exclusions” section set forth below, all replacement parts free of
charge, necessary to correct such defects. This “Limited Five Year Warranty” is null and void if this plumbing product has not been installed
and maintained in accordance with all written instructions accompanying the product, and if non-Fluidmaster Inc. parts are used in installation.
EXCLUSIONS: FLUIDMASTER INC. SHALL NOT BE LIABLE FOR INCIDENTAL OR CONSEQUENTIAL DAMAGES, INCLUDING COSTS OF
INSTALLATION, WATER DAMAGE, PERSONAL INJURY OR FOR ANY DAMAGES RESULTING FROM ABUSE OR MISUSE OF THE PRODUCT,
FROM OVERTIGHTENING OR FROM FAILURE TO INSTALL OR MAINTAIN THIS PLUMBING PRODUCT IN ACCORDANCE WITH THE WRITTEN
INSTRUCTIONS, INCLUDING USE OF NON-FLUIDMASTER PARTS. DO NOT USE IN-TANK DROP-IN TOILET BOWL CLEANERS CONTAINING
BLEACH OR CHLORINE. USE OF SUCH PRODUCTS WILL RESULT IN DAMAGE TO TANK COMPONENTS AND MAY CAUSE FLOODING AND
PROPERTY DAMAGE. USE OF SUCH PRODUCTS WILL VOID THIS WARRANTY.
DO NOT USE IN-TANK DROP-IN TOILET BOWL CLEANERS CONTAINING
BLEACH OR CHLORINE. Use of such products will: (1) RESULT IN
DAMAGE to tank components and MAY CAUSE FLOODING and
PROPERTY DAMAGE and (2) VOID FLUIDMASTER WARRANTY.
Fluidmaster Flush 'n Sparkle
®
Toilet Bowl Cleaning System is
recommended for those choosing to use in-tank bowl cleaners and
WILL NOT VOID the FLUIDMASTER WARRANTY because it will not
damage the components. DO NOT overtighten nuts or tank/bowl may crack. Always use
quality Fluidmaster parts when installing or repairing. Fluidmaster will not be responsible
or liable for use of non-Fluidmaster parts during installation or repair.
WARNING
31
Add trim (D).
36
Snap handle (E) into place. Check flush.
Adjust arm (C) again if needed.
*To adjust lever arm (C) for a right-side toilet, separate arm (C) from
the elbow and attach to the other side.
38
2 3
5
INSTALL WITH CONFIDENCE
Insert lever mount (A). **If loose, use sleeve.
Hand-tighten locknut (B).
ROTATE.
SOME FORCE REQUIRED.
ADJUST LENGTH.
Adjust arm (C). Attach chain. Give chain roughly 1/2" slack (small J shape)
with flapper closed (check by moving arm up/down).
Click arm (C) into lever mount (A).
FRONT
RIGHT
SIDE
ANGLE
ADJUSTABILITY
SIDE and VERTICAL
ANGLE
MANSFIELD
®
RIGHT SIDE
OTHER VARIATIONS
34
Sleeve
(optional)
Lever Mount (A)
Trim (D)
Handle (E)
Locknut (B)
Arm (C)
7
30800 Rancho Viejo Rd.,
San Juan Capistrano, CA 92675
www.fluidmaster.com
800-631-2011
ADDITIONAL QUESTIONS?
For installation assistance, contact our technical services department.
EMAIL, CHAT
or
CALL
our toll-free number.
www.fluidmaster.com/support 1-800-631-2011
Hours Available: Monday – Friday 5:30 AM - 5:00 PM PST
YOU DID IT!
We knew you could!
Share your success story
with friends and family!
#FixedMyToilet #Fluidmaster
@Fluidmaster Inc
@MasteroftheTank
@fluidmaster_inc
A
B
Remove old lever.
36
5