
Install Instructions


Step 12: Ensure that the
FILL VALVE REFILL TUBE is
still attached to your
OVERFLOW PIPE.
Remove foam around
ADJUSTMENT DIALS.
Step 15: Unsnap FLUSH
CABLE from DUO FLUSH
TM
.
Note: Make sure not to
sharply bend or kink the
FLUSH CABLE.
FILL
VALVE
FLUSH
VALVE
SEAT
OVERFLOW
PIPE
SECTION 4: INSTALLING THE DUO FLUSH
TM
VALVE
INSTALLING THE DUO FLUSH VALVE
SECTION 5: INSTALLING THE DUAL ACTION HANDLE
DUO FLUSH
TM
TROUBLESHOOTING
Step 13: Locate white arrow
on SNAP-ON MOUNT and align
it facing the OVERFLOW PIPE.
Do not install yet.
THE FLUSH HANDLE
ACTUATOR SHOULD
BE ORIENTED
VERTICALLY
THE FLUSH HANDLE SHOULD BE
MOUNTED HORIZONTALLY
HOLD HANDLE HORIZONTALLY
REMOVE LOCK NUT
TURN LOCK NUT
CLOCKWISE
TO LOOSEN
FLUSH
CABLE
SEE NOTE
BELOW
Step 16: Press DUO FLUSH
onto seat.
Note: Be sure the FLUSH
CABLE is not caught
between the SNAP-ON
MOUNT and the FLUSH
VALVE SEAT when
installing.
FLUSH
VALVE SEAT
FLUSH VALVE
SNAP-ON
MOUNT
FLUSH
CABLE
TANK LEVER
HOLE
ALIGNMENT
ARROW
ORIENT TABS
VERTICALLY
Step 21: Install nut
counter-clockwise to
tighten.
Step 17: Remove the
HANDLE from the green
bag labeled D.
Step 18: Unthread LOCK
NUT in a clockwise
rotation on HANDLE.
Step 19: Rotate handle
COLLAR so alignment
tabs are positioned
vertically.
Step 20: Insert the HANDLE
into toilet hole.
Step 22: Ensure that the
HANDLE is positioned horizon-
tally by holding handle horizon-
tally before snapping into place
into tank.
Alignment
Tabs
Dual Action
Handle
Collar
Lock Nut
(Turn counterclockwise
to tighten)
Handle
Actuator
Flush
Cable
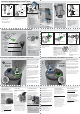
3. PerforMAX
TM
Fill Valve
Problem: Why do I need a
PerforMAX
TM
fill valve?
Solution: The PerforMAX
TM
Fill
Valve optimizes the performance
of your toilet bowl’s flush.
4. Unused Parts
Problem: Why do I have parts left
over from my kit?
Solution: Depending on the type
of flush valve you have identified,
you may have additional parts left
which may include an angled seat
adaptor, brass seat adaptor and
the overflow tube and clip.
Note: The overflow tube and clip
(in the clear plastic bag) should be
used with the PerforMAX
TM
Fill
Valve. If you currently do not have
the PerforMAX
TM
Fill Valve, save
parts for future use.
In combination with the
Water Savings Refill Module,
the PerforMAX
TM
Fill Valve will
maximize your toilet’s flush
performance by ensuring the
water level in your toilet bowl
is correct with every flush.
2. Seal Leaking
Problem: The tank continues to
leak water causing water loss in
the tank.
Solution:
First
remove
the handle
actuator
by holding
the top
end of
6. Full flush will not
adequately remove waste
Move the FULL FLUSH
ADJUSTMENT DIAL (Blue) to a
higher number to allow more
water to be flushed.
5. Half flush will not
adequately remove waste
Move the HALF FLUSH
ADJUSTMENT DIAL (Green) to
a higher number to allow
more water to be flushed.
7. Angled Seat Adapter
Removal
If you need to remove the
ANGLED SEAT ADAPTER from
your system, pull the adapter
upward firmly to release it
from the FLUSH VALVE SEAT.
For further assistance, call
Fluidmaster Technical Support
at (800) 631-2011 M-F
7:30 am - 4:30 pm PST.
Rotate handle downward 15
(degrees) and reinsert actuator
into handle.
If tank lever does not fit properly
on your toilet tank, for further
help visit www.duoflush.com or
call Fluidmaster Technical Support
at (800) 631-2011) M-F 7:30 am –
4:30 pm PST.
More Information
Please visit our website at
www.fluidmaster.com for more
solutions to common toilet
problems.
Do not return to the store.
Call technical support first if
you have an installation
problem.
For further help visit
www.duoflush.com or call
Fluidmaster Technical Support at
(800) 631-2011) M-F 7:30 am –
4:30 pm PST.
SECTION 6: WATER LEVEL ADJUSTMENT: HALF FLUSH SECTION 7: WATER LEVEL ADJUSTMENT: FULL FLUSH
Step 25: Ensure that the half flush
and full flush are both set to MAX
settings before you start adjusting
your settings. To adjust the settings,
push the knob down and turn.
Step 26: THE ADJUSTMENT DIAL
with GREEN DISC (look for the
symbol) controls your half flush.
Press down and turn to “MAX” to
start.
A. Drop 3 pieces of toilet paper into
the bowl and ROTATE the HANDLE
upward (half flush). If the flush is
successful, adjust the setting to the
next lower numbered setting.
Repeat step A.
B. Continue to adjust the setting to
the next lowest number until the
flush is not successful.
C. Adjust your setting back to the
last successful flush setting that
provided you with a successful flush.
Step 27: The ADJUSTMENT DIAL
with BLUE DISC (look for the
symbol) controls your full flush.
A. Start the full flush dial 1 setting
higher than the half flush setting.
B. Drop 3 pieces of toilet paper into
the bowl and ROTATE the HANDLE
downward (full flush). If the flush is
successful keep setting as is.
C. If the contents in your toilet bowl
do not successfully flush down after
use, adjust setting up to the next
highest number. Repeat step B.
PUSH DOWN
AND TURN
TO ADJUST
PUSH DOWN
AND TURN
TO ADJUST
Step 14: Rotate
DUO FLUSH
TM
on
SNAP-ON MOUNT so
the FLUSH CABLE
points directly
toward the tank
lever hole.
FLUSH
CABLE
FLUSH
CABLE
SNAP-ON
MOUNT
Step 23: Attach
HANDLE ACTUATOR to
the handle COLLAR on
HANDLE. If necessary,
rotate DUO FLUSH
TM
on
SNAP-ON MOUNT so the
FLUSH CABLE angles
toward the tank lever
hole.
Step 24: Turn water on
to fill tank.
F
U
L
L
PerforMAX
TM
Fill Valve
Water Saving Refill Module
the actuator and pull
away from dual action handle
collar. Grab the top of the Duo
Flush and gently rock (away from
fill valve) and pull up on Duo
Flush. Once released clean seat
and inspect piston seal at bottom
ensuring the seal is centered on
piston. Reattach Duo Flush and
handle actuator. Turn on water and
recheck water level for leaking.
1. Tank Lid Interference on
Half (Upward) Flush
Problem: Tank lever hits tank lid
forcing the user to hold the handle
Solution: Remove handle actuator
by holding the top end of actuator
and pull away from dual action
handle collar. DO NOT pull on
FLUSH CABLE when removing the
handle actuator.