
Installation Guide


FlowGuard Gold
®
JANUARY 2013
3
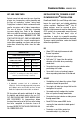
SET AND CURE TIMES
Solvent cement set and cures time are a function
of pipe size, temperature, relative humidity and
the type of cementing "system" being used.
Drying time is shorter in drier environments with
smaller size pipes and in higher temperatures.
The use of primer in two-step cementing
increases drying time. Refer to the following
table as a guide for minimum cure times before
pressure testing begins. MINIMUM CURE TIME
STARTS AFTER THE LAST JOINT HAS BEEN MADE
UP. Always consult the cement manufacturer's
instructions regarding cure times and use those
instructions should they differ from the table
below.
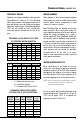
MINIMUM CURE
PRIOR TO PRESSURE TESTING @ 150 PSI
AMBIENT TEMPERATURE
DURING CURE PERIOD
PIPE SIZES
1/2 - 1" 1-1/4" - 2"
Above 60°F 1 hour 2 hours
40°F - 60°F 2 hours 4 hours
Below 40°F 4 hours 8 hours
Be prepared to allow extra time at temperatures
below 50°F, for setting and curing. Keep cement
warm to prevent thickening or freezing.
TESTING
• A hydrostatic pressure test at a minimum of
150 psi for 1 hour is strongly suggested, but pressure
up to 400 psi can be used if extra cure time, at least
double the requirements in above table, are allowed.
Fill the system with water and bleed all air from
the highest and farthest points in the run. CUT
OUT AND DISCARD ANY JOINTS WHERE LEAKS
ARE DISCOVERED. At temperatures below
freezing, blow water out of the lines after testing
has been completed to eliminate chance of
freezing. NEVER TEST WITH HIGH PRESSURE AIR
OR COMPRESSED GAS.
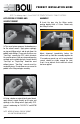
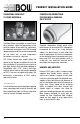
INSTALLATION TIPS TO INSURE A QUIET
FLOWGUARD GOLD
®
INSTALLATION
FlowGuard Gold
®
Pipe and Fittings offer home
buyers the most quiet and reliable plumbing
system available. FlowGuard Gold
®
, like all
piping systems, must be secured in place.
However, slight movement must be allowed for in
CPVC systems to accommodate normal thermal
expansion. This “firm but loose” style of
installation is simple to accomplish providing
that correct materials and methods are employed.
To ensure a quiet installation, contractors should
follow these guidelines.
DO
• Allow CPVC tube slight movement with
thermal expansion.
• Use plastic pipe straps.
• Drill holes 1/4" larger than the outside
diameter of the tube when penetrating
wood studs.
• Use protective pipe isolators when
penetrating steel studs.
• Use metallic clevis or tear drop hangers
when suspending tube from all thread rod.
DO NOT
• Overtighten or lock down the system. Slight
movement should be permitted.
• Use single nail talon type straps that tend to
overtighten the system.
• Use wood or plastic wedges that restrain
tube as it passes through wood studs.
• Use protective pipe isolators as tube passes
through wood studs.
• Bend CPVC tube around DWV stacks
causing the two materials to bind against
each other.
• Terminate a run of tube against an
immovable object (e.g. floor joist).