
User Guide


Advanced GUI Editing
Module GUI
In the Modules chapter we learned how to enable a module’s front panel, add items to it and move them around. We used sliders, knobs and
switches from the toolbox. These are themselves modules but their front panels are constructed using GUI components.
In this chapter you’ll see how to create your own front panels using the GUI components. Working at this level you have complete control
over every detail of how your front panel looks and behaves.
Module GUI Component
We’ve already seen that the starting point for any GUI in FlowBotics Studio is a module. Modules provide the base on which a GUI can be
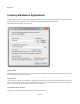
constructed via their front panel. You can enable the front panel by clicking the G button on the action panel.
However, if you want to use the GUI components you need to have access to the panel within your schematic and this is done through the
Module GUI component (or MGUI for short).
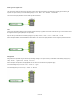
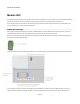
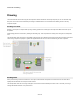
Create a new module then drop an MGUI component inside. You can find the MGUI component under the Module filter group in the toolbox.
If you move back up a level you'll see that the module now looks a bit different. It now has a front panel, albeit with nothing in it. You can
resize the module to make the panel bigger or smaller. You may also notice that the G button has been removed from the action panel.
87 of 212