
User Guide


DLL Component
That's it! Click the trigger button and your dll will process the inputs and send any result out.
A note about Outputs
As we saw in the previous section the array of output data is populated in your dll code. Anything you put there will be accessible from the
outputs on the DLL component. However, how and indeed whether the outputs send out this data depends on which Exec input you use to
invoke the call to your dll function.
Exec 1 - green Trigger connector
If you use the first Exec input then all outputs that are not a Ruby Value connectors will be sent a trigger and hence anything you have
connected to these outputs will be updated after the dll function has been executed.
Exec 2 – Ruby Value connector
If you use the second Exec input then all outputs that are also Ruby Value connectors will be sent a Ruby event after the dll function has
been executed.
All other connectors will have their values updated but no triggers will be sent. This is because the Ruby Value input is usually used for audio
which is running at sampling rate. Triggering green connectors at this frequency would be way too cpu intensive.
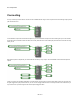
If you do need to be able to read a green triggered data output under these circumstances then the best way to do this is to connect a trigger
from a Ticker (or something similar) to the same input that the output from your DLL component is connected to.
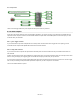
This is much better illustrated in a picture:
197 of 212