
User Guide


User Interface
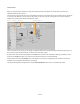
The second way to create a local toolbox is to select a module and then then choose Create Local Toolbox from the Schematic menu or
press SHIFT + CTRL + T. On this occasion the Local Toolbox will contain all the components that are inside the module.
Note that the local toolbox has no dependency on the components from which it was created. This means that you can create a local toolbox
then delete the components that it was made from.
So for example, a teacher could create a schematic that they want students to build, make a local toolbox from that schematic and then
delete everything on the schematic. The student can then take that schematic and be asked to recreate the original from the building blocks
in the local toolbox.
Removing a Local Toolbox
To remove a local toolbox, choose Remove LocalToolbox from the Schematic menu or press SHIFT + CTRL + T once again.
Restoring a Local Toolbox
You can restore the last local toolbox by selecting Restore Local Toolbox from the Schematic menu or by pressing SHIFT + CTRL + T once
again. This allows you to easily switch between local and full sized toolboxes.
Restoring a Local Toolbox
You can restore the last local toolbox by selecting Restore Local Toolbox from the Schematic menu or by pressing SHIFT + CTRL + T once
again. This allows you to easily switch between local and full sized toolboxes.
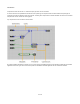
Saving and Loading a Local Toolbox
A local toolbox is automatically saved with its schematic. So when you open a schematic again, any local toolbox is restored.
As we said earlier, you can delete everything in the schematic and still save it with the local toolbox.
10 of 212