
User Guide


User Interface
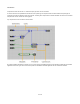
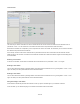
Before you can begin using the software you need to know a little bit about the user interface. Let’s start by taking a look at the main
application window and how it’s laid out.
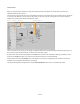
Across the top of the window is the menu bar. All the applications functions can be accessed from here and it’s the first place you should look
if you’re new to the software and you want to get an idea of what you can do with it. As your mouse passes over menu items help text is
displayed on the status bar at the bottom of the application window.
You won’t stay with the menu bar for very long though. In FlowBotics Studio there are usually several ways to execute the same action so in
time you’ll find yourself using direct interaction, context menus or shortcut keys instead.
Running down the left-hand side of the application is the Toolbox, which provides all the components for building your schematics. To the
left of this is the Tag Bar. This allows you to quickly access components based on a set of configurable tags.
Across the top of the window is the Navigator. As it’s name suggests, this is used for navigating through your schematic. You’ll find this
invaluable once your schematics start to become more complex.
The majority of the application workspace is taken up by the Schematic Window. This is where your schematics are created.
6 of 212
Navigator Schematic WindowToolboxTag Bar