
User Guide

Ruby Component
Custom Line Caps
If you want to create your own custom line caps then you can do this using the CustomLinecap class. You create an instance of this class
the use it to set the start or end cap for the pen.
Before you can do any of this you will need to create a GraphicsPath object. This will define the shape of the line cap.
You create a graphics path in the same way as usual. The units are still grid squares, however the coordinate system is relative to the line.
This is necessary because when the line changes direction you want the end cap to change its orientation accordingly.
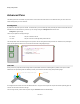
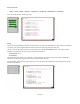
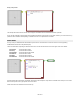
The diagram below shows how the coordinate system works. Figure 1 shows the axes relative to an arbitrary line. Figure 2 shows a single
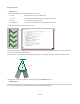
line having been added to the graphics path for the custom end cap. The line starts at (1,0) and ends at (0,1). If we added another line from
(0,1) to (-1,0) and closed the path then we'd have a path to make our own custom arrow head line cap.
So now we go back to the CustomLineCap class. We can create an instance of this class in one of two ways. Either we have an end cap
where the path shows as an outline or we have a path which is filled (with the pen color). Here's how you handle both cases:
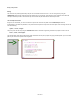
c = CustomLineCap.new nil,path,0 # line cap outline
c = CustomLineCap.new path,nil,0 # line cap filled
The third parameter is the offset of the cap from the line in grid squares. A positive offset will move the cap away from the line and a negative
one will pull it closer.
Now that you have a CustomLineCap object you can use the setCustomStartCap and setCustomEndCap methods of the Pen class to
assign the cap to the Pen. The example below shows how this all works.
146 of 212