
Installation Guide


Page 24 of 36 versatile™ 4C Installation Manual -- 206362 -- Rev A
www.orencemailboxes.com
MULTIPLE INSTALLATION USING FLORENCE’S EXCLUSIVE
MULTI-UNIT CONNECTOR KIT (cont.)
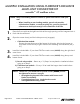
5 .
Fasten the multi-unit connector to the module using the included #8-32 x 1/2” button-head
151P Torx+ screws (91123).
• If installation and wall layout design does not require a multi-unit connector,
the kit may not be included with the module.
6 .
Place the next module in the opening until the integrated trim is flush with the wall board.
Slide the module to the right until the trim is against the previously installed unit.
7 .
Install the included #8-32 x 1/2” button-head 151P Torx+ screws (91123) along the right-
hand outer frame.
NOTE: The #8 x 2” pan-head T20 Torx wood screws (64225) should
be tightened to ensure a snug fit.
• Overtightening beyond initial contact with frame could
hinder functionality.
• If overtightening occurs, simply back out each
overtightened mounting screw.
versatile™ 4C mailbox suites