
Operation Manual


10
IE
GB
B
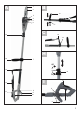
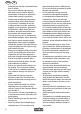
General description
Theoperationandmaintenance
illustrationsareonthefrontfold-out
page.
1.Sawchain
2.Chainbar
3.Bumber
4.Bladexingscrew
5.Chainadjustmentring
6.Sprocketchainwheelcovering
7.Brakearm
8.Pivotalcentre(notvisible)
9.Adjustablehandle
10.On/offswitch
11. Safetylock(notvisible)
12.Shoulderstrap
13.Eye(forshoulderstrap)
14.Roundhandle
15.Quickrelease(fortelescopichandle)
Fitting
• Pulloutthepowerplugbeforedoing
anyworkonthehighpruningsawits-
elf-–injuryhazard!
• Alwayaswearcut-protectiongloves
• Incaseofdifculties,consultaspe-
cialistforadvice.
Beforeusingthehighpruningsaw,you
must:
-asseblingtheroundhandle
-attachingtheshoulderstrap
-ttingtheblade
-ttingthesawchain
-tensioningthesawchain
-llupwithchainoil
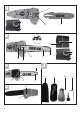
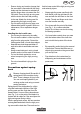
Assembling the Round Handle
1. Setroundhandle14tothedesired
positiononthetelescopichandle.
2. Placebrakearm7onthetelescopic
handle.
3. Screwtogetherroundhandle14and
brakearm7.
4. Theheightorholdingangleofround
handle14canbeadjustedatany
timebyslightlylooseningthescrews,
pushing/turning,andretighteningthe
screws.
Attaching the Shoulder Strap
Fixthespringhookonshoulderstrap12
intoliftinglug13onthetelescopichandle
oftheequipment.
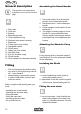
Installing the Blade
1.Loosenbladexingscrew4andre-
movechainwheelcover6.
2.Insertblade2withthecentrallongitudi-
nalholeovercentralbladeguide16.
Fitting the saw chain
1.Layoutsawchain1suchthatthebev-
elledcuttingedgesofthechainlinks
pointinaclockwisedirection.Seethe
detailedillustration.
C
D
E
A