
Product Manual
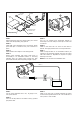

STEP I
Remove shipping plugs from Quad pump ports. Some
water from factory testing may spill out.
STEP 2
Install inlet A and discharge B port connectors. Firmly
push slide clips C forward to lock port connectors in
place.
STEP 3
Slide rubber mounts fully into 4 mounting tracks.
STEP 4
Mount pump vertically, with pump head down or
horizontally in an accessible location. If mounting
vertically, motor up, attach motor mounts first, then
pump head mounts, while supporting weight of pump.
STEP 5
Use 1/2” I.D. flexible hose (preferably braided or
reinforced). Use hose clamps on the slip-on barb hose
connectors.
STEP 6
Install no less than 3/8” I.D. hose for feed lines to
fixtures. Use high pressure hose on all city water lines.
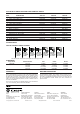
STEP 7
Install a Flojet strainer in an accessible location (for
inspection and cleaning) between the tank and pump
inlet. This strainer or equivalent is required for pump
warranty to be valid.
NOTE: Do not use with an accumulator tank.
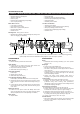
INSTALLATION
STEP I
Use 14 gauge stranded wire to 20’, 12 gauge to 50’,
from power source.
STEP 2
Use a 10-15 amp rated on-off switch on the (+) positive
(red ) mot or lead .
STEP 3
Install 10-15 amp fuse or breaker between the power
source and the positive lead for the -143 models and a
4 amp fuse for -343 models.
WIRING
Red (+)
Fuse
(+)
Switch
Battery
(–)
Black (–)
City Water
Inlet
Water
Tank
Autofill Tank Valve,
Plumb to Tank
Check
Valve
Flojet Inlet
Strainer
Do Not Plumb Autofill
to Pump Suction Line
Water
Heater
B
A
C