
User Guide


Installing and Connecting the Camera
January 14, 2019
Ariel CB-3102 User and Installation Guide
21
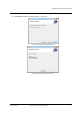
If you do not promptly close your browser, a dialog box opens, prompting you
to restart your computer, in order to save changes.
Figure 23: Ariel Player Restart System Dialog Box
Click Yes. The computer reboots and the Rebooting Completed message
appears.
Click OK. The Live View screen is displayed.
To manage the camera using Latitude or on a network with static IP configuration
1. Download the DNA software form the website (see 2.3 Accessing Camera Information from the
Web).
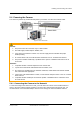
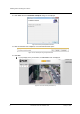
2. Run the dna.exe file by clicking the icon. The DNA application opens and the device is
displayed in the DNA Discovery window. See Figure 10: DNA Discovery Window (page 16).
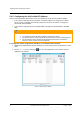
3. Select the unit by right-clicking it. The DNA - Assign IP window is displayed.
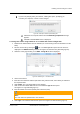
Figure 24: DNA Assign IP - Use DHCP Screen
4. Uncheck Use DHCP.
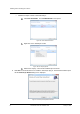
5. Enter the unit’s default IP address (192.168.0.250), Subnet mask, and Gateway IP address in
the respective field.
6. Click Update. The unit reboots with the new settings.
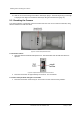
7. Click on the unit in DNA’s Discover List. The camera’s Login window opens.
See Figure 11: Login Window (page 17).
8. Enter the default User Name (Admin) and Password (1234).
Note:
The user name and password are case-sensitive.
9. Click Login. The camera’s web interface opens. See Figure 12: Web Interface (page 17).