
User Guide


Installing and Connecting the Camera
16
Ariel CB-3102 User and Installation Guide
January 14, 2019
5.4.2 Configuring the Unit’s Initial IP Address
Use the FLIR DNA utility to discover the unit on the network and to set the unit’s initial IP address.
If the camera is managed by FLIR’s Horizon or Meridian VMS and is configured as a DHCP
server, Horizon or Meridian automatically assigns the camera an IP address. Configure the
camera with DHCP-enabled.
If the camera is managed by FLIR’s Latitude VMS, manually enter its IP address in the DNA
utility.
Note:
1. It is possible to set the IP address without changing the subnet.
2. The unit and the PC must be physically connected on the same network segment.
3. The PC browser version must be 32-bit Internet Explorer (IE 10 and above).
(Chrome / Opera / Firefox are also supported)
To manage the camera using Horizon, Meridian, or on a DHCP-enabled network
1. Download the DNA software form the website (see 2.3 Accessing Camera Information from the
Web).
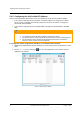
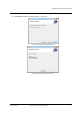
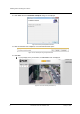
2. Run the dna.exe file by clicking the icon. The DNA application opens and the device is
displayed in the window.
Figure 10: DNA Discovery Window