
User's Guide
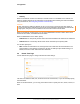
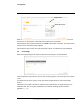

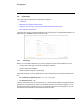

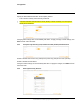
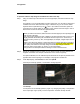
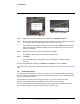
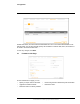
Table Of Contents
- Table of Contents
- Radar Overview
- Installation
- 2.1 Configuring the Radar for Networking
- 2.2 Radar Placement and Orientation
- 2.3 Site Preparation
- 2.4 Installing the Wall Mount Bracket
- 2.5 Connecting the Radar and Installing the Back Box
- 2.6 Installing the Radar Assembly
- 2.7 Uploading a Map Image and Configuring Georeference Settings
- 2.8 Aiming the Radar and Testing Target Detection
- 2.9 Defining Analytics Regions
- 2.10 Pairing a PTZ Camera with the Radar (Optional)
- Operation
- Configuration
- Maintenance and Troubleshooting Tips

427-0101-01-12 Revision 100 September 2020 30
This document does not contain any export-controlled information.
Configuration
To generate and install a self-signed certificate:
Step 1 In the Certificates section, under
Certification area, select Self-Signed.
Step 1 Enter information such as country
code, city name, and organization
name.
Step 2 Click Create Certificate.
Step 3 Allow 15 seconds for the radar to
generate the certificate, at which point
a confirmation appears.
To upload a self-signed or third-party CA signed certificate:
Step 1 Select Upload Certificates.
Step 2 If you are uploading a self-signed certificate, under Public Key and then under Private
Key:
aClick .
b Select the appropriate key file.
cClick .
If you are uploading a third-party CA signed certificate, select and upload the Public Key,
Private Key, and CA Certificate.
Step 3 Verify that the radar certificate files are valid. Make sure Certificates are OK appears
under the certificate information. Certificate information appears at the bottom of the
Certificates section, under Download certificate.
4.4.2 IEEE 802.1X-Compliant Communication
Enable or disable IEEE 802.1X-compliant TLS communication.