
User's Guide
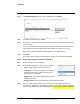

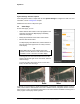

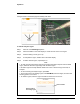
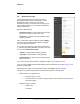
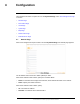
Table Of Contents
- Table of Contents
- Radar Overview
- Installation
- 2.1 Configuring the Radar for Networking
- 2.2 Radar Placement and Orientation
- 2.3 Site Preparation
- 2.4 Installing the Wall Mount Bracket
- 2.5 Connecting the Radar and Installing the Back Box
- 2.6 Installing the Radar Assembly
- 2.7 Uploading a Map Image and Configuring Georeference Settings
- 2.8 Aiming the Radar and Testing Target Detection
- 2.9 Defining Analytics Regions
- 2.10 Pairing a PTZ Camera with the Radar (Optional)
- Operation
- Configuration
- Maintenance and Troubleshooting Tips

4
427-0101-01-12 Revision 100 September 2020 25
This document does not contain any export-controlled information.
Configuration
Users assigned the admin or expert role can click System Settings on the View Settings Home Page
to access:
• Network Page
• Date & Time Page
• Users Page
• Cyber Page
• Map Page
• Radar Fusion Page
• Firmware & Info Page
4.1 Network Page
When a user assigned the expert or admin role clicks System Settings, the Network page appears.
The IP address mode can be set to DHCP (default) or Static.
When the IP address mode is DHCP, specify the Hostname Mode:
• DHCP—The DHCP server assigns the hostname, which identifies the radar on the network.
• Static—Specify the radar's hostname.
When the IP address mode is Static, specify:
• IP—The radar's IP address
• Netmask—The default value is 255.255.255.0