
User's Guide
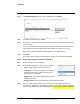

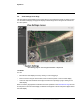
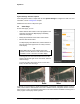

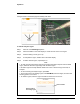
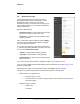
Table Of Contents
- Table of Contents
- Radar Overview
- Installation
- 2.1 Configuring the Radar for Networking
- 2.2 Radar Placement and Orientation
- 2.3 Site Preparation
- 2.4 Installing the Wall Mount Bracket
- 2.5 Connecting the Radar and Installing the Back Box
- 2.6 Installing the Radar Assembly
- 2.7 Uploading a Map Image and Configuring Georeference Settings
- 2.8 Aiming the Radar and Testing Target Detection
- 2.9 Defining Analytics Regions
- 2.10 Pairing a PTZ Camera with the Radar (Optional)
- Operation
- Configuration
- Maintenance and Troubleshooting Tips

427-0101-01-12 Revision 100 September 2020 24
This document does not contain any export-controlled information.
Operation
3.5 Georeference Page
Use the Georeference page to specify the radar’s
geographical location and mounting position. Users
assigned the admin or expert role can use the
Georeference page in conjunction with the Map Page in
System Settings, where you can upload and calibrate a
reference map image.
Specify the Elara Radar’s:
• Installation Height, in meters above the surrounding
ground level (it must be greater than zero)
• Orientation, in degrees from North, between 0-360
degrees (required)
Then, scroll down to GPS Coordinates and click Apply.
The radar's onboard GPS provides latitude, longitude,
and ground altitude information.
You can also manually specify georeference information,
or, if the map is properly calibrated, right-click on the map
and then click Georeference sensor.
• Latitude, in degrees North or South (required)
• Longitude, in degrees East or West (required)
• Ground Altitude, in meters above sea level (must be
greater than zero)
If you don’t know the ground altitude or installation height, you can specify zero (0).
If you are using a Digital Elevation Model (DEM) and have uploaded it on the Map Page, you can
enable it by clicking On.
After making any change on the Georeference page, click Save to save the changes.
The radar can report this georeference information via FLIR CGI or ONVIF, which:
• Allows the user or an application to:
• Show the radar on a map
• Show the direction the radar is facing (using the radar’s detection range, which the
radar also reports)
• Supports cueing or showing:
• Radar tracks
• I/O alarms