
User's Guide

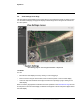
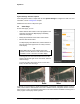

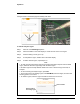
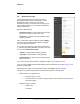
Table Of Contents
- Table of Contents
- Radar Overview
- Installation
- 2.1 Configuring the Radar for Networking
- 2.2 Radar Placement and Orientation
- 2.3 Site Preparation
- 2.4 Installing the Wall Mount Bracket
- 2.5 Connecting the Radar and Installing the Back Box
- 2.6 Installing the Radar Assembly
- 2.7 Uploading a Map Image and Configuring Georeference Settings
- 2.8 Aiming the Radar and Testing Target Detection
- 2.9 Defining Analytics Regions
- 2.10 Pairing a PTZ Camera with the Radar (Optional)
- Operation
- Configuration
- Maintenance and Troubleshooting Tips

427-0101-01-12 Revision 100 September 2020 23
This document does not contain any export-controlled information.
Operation
Changes made on the Radar page immediately take effect.
To add an analytics region:
Step 1 Click one of the Add Region options.
Step 2 Click and release on the radar display to create the first corner of the region.
Step 3 Continue adding corners (up to 16).
Step 4 To complete the region, double-click on the radar display.
Step 5 To define another region, repeat steps 1-5.
Tips
• To make sure the radar detects objects and creates tracks before objects enter the alarm
region, define the detection region larger than the alarm region.
• Exclusion regions can help eliminate alarms from a tree or bush moving in the wind, for
example.
• To cancel creating an analytics region, press Esc.
• To move the points of an existing region, select Edit Mode, select the region, and then click
and drag points to move them.
• To delete a region, select the region and click the trash can icon next to it.
Click to delete
Select to edit an
an existing region