
User's Guide
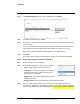

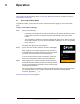
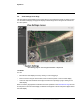
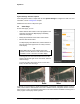

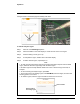
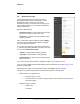
Table Of Contents
- Table of Contents
- Radar Overview
- Installation
- 2.1 Configuring the Radar for Networking
- 2.2 Radar Placement and Orientation
- 2.3 Site Preparation
- 2.4 Installing the Wall Mount Bracket
- 2.5 Connecting the Radar and Installing the Back Box
- 2.6 Installing the Radar Assembly
- 2.7 Uploading a Map Image and Configuring Georeference Settings
- 2.8 Aiming the Radar and Testing Target Detection
- 2.9 Defining Analytics Regions
- 2.10 Pairing a PTZ Camera with the Radar (Optional)
- Operation
- Configuration
- Maintenance and Troubleshooting Tips

427-0101-01-12 Revision 100 September 2020 16
This document does not contain any export-controlled information.
Installation
Step 2 Click System Settings and then on the navigation bar, click Radar.
Step 3 To activate the radar settings, click On.
Step 4 From the list of devices on the same LAN segment as the camera, select the radar to pair
with the camera.
If you have configured one radar (X) to fuse tracking information from another radar (Y),
select radar X. For more information about fusing radars, see Radar Fusion Page.
Make sure the radar’s IP address and port appears next to Radar Sensor.
Step 5 Click Save.
The camera reboots. After the camera reboots, log back in to the camera’s web page.
2.10.2 Enable and Configure an Automatic Radar Mode
Step 1 In View Settings, open the PTZ page.
Step 2 From the Radar Modes list, select one of the following:
• None—Radar tracks do not affect the camera.
• Track Scan—The camera performs a tour scanning
all existing radar tracks. It follows each track for a
specific amount of dwell time.
• Engage Last—The camera follows the most recently
detected radar track.
• Engage Closest—The camera follows the track closest to the radar.
Step 3 When any radar mode is selected, you can lock the camera to follow the currently
engaged track. Under Track, click Lock. The camera will not move to another radar track
until: you click Unlock, the current track disappears, or it no longer meets the conditions.