
User's Manual Part 1
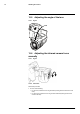
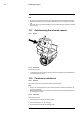
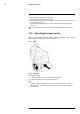
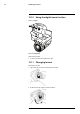
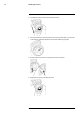
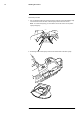
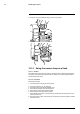
Table Of Contents
- 1 Disclaimers
- 2 Safety information
- 3 Notice to user
- 4 Customer help
- 5 Quick start guide
- 6 List of accessories and services
- 7 A note about ergonomics
- 8 Camera parts
- 9 Screen elements
- 10 Navigating the menu system
- 11 Pairing Bluetooth devices
- 12 Configuring Wi-Fi
- 13 Handling the camera
- 13.1 Charging the battery
- 13.2 Turning on the camera
- 13.3 Turning off the camera
- 13.4 Adjusting the viewfinder’s dioptric correction
- 13.5 Adjusting the angle of the lens
- 13.6 Adjusting the infrared camera focus manually
- 13.7 Autofocusing the infrared camera
- 13.8 Continuous autofocus
- 13.9 Operating the laser pointer
- 13.10 Using the digital zoom function
- 13.11 Changing lenses
- 13.12 Calibrating the compass
- 13.13 Changing the viewfinder eyecup
- 13.14 Using the camera lamp as a flash
- 14 Working with images

Handling the camera13
Note
• Do not touch the lens surface when you adjust the infrared camera focus manually. If
this happens, clean the lens according to the instructions in 27.2 Infrared lens, page
456.
• The focus ring can be rotated infinitely, but only a certain amount of rotation is needed
when focusing.
13.7 Autofocusing the infrared camera
13.7.1 Figure
13.7.2 Procedure
Follow this procedure:
1. To autofocus the camera when continuos autofocus is disabled, push the Autofocus/
Save button half-way down.
13.8 Continuous autofocus
13.8.1 General
The camera can be set up to perform continuous autofocusing.
Note
• In this mode, the digital camera is used, which means that continuous autofocus will
not work in darkness.
• When continuous autofocus is enabled, it is not possible to manually adjust the focus
by rotating the focus ring.
13.8.2 Procedure
Follow this procedure:
1. Push the joystick to display the menu system.
2. Use the joystick to go to
(Settings).
3. Push the joystick to display the Settings menu.
#T559880; r. AL/45866/46124; en-US
27