
User's Manual Part 1
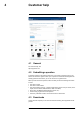


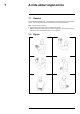
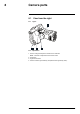
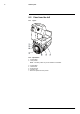
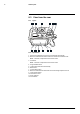
Table Of Contents
- 1 Disclaimers
- 2 Safety information
- 3 Notice to user
- 4 Customer help
- 5 Quick start guide
- 6 List of accessories and services
- 7 A note about ergonomics
- 8 Camera parts
- 9 Screen elements
- 10 Navigating the menu system
- 11 Pairing Bluetooth devices
- 12 Configuring Wi-Fi
- 13 Handling the camera
- 13.1 Charging the battery
- 13.2 Turning on the camera
- 13.3 Turning off the camera
- 13.4 Adjusting the viewfinder’s dioptric correction
- 13.5 Adjusting the angle of the lens
- 13.6 Adjusting the infrared camera focus manually
- 13.7 Autofocusing the infrared camera
- 13.8 Continuous autofocus
- 13.9 Operating the laser pointer
- 13.10 Using the digital zoom function
- 13.11 Changing lenses
- 13.12 Calibrating the compass
- 13.13 Changing the viewfinder eyecup
- 13.14 Using the camera lamp as a flash
- 14 Working with images

Quick start guide
5
5.1 Procedure
Follow this procedure:
1. Put a battery into the battery compartment.
2. Charge the battery for 4 hours before starting the camera for the first time.
3. Insert a memory card into the card slot.
4. Push the On/off button
to turn on the camera.
5. Aim the camera toward the object of interest.
6. Adjust the focus.
Note It is very important to adjust the focus correctly. Incorrect focus adjustment af-
fects how the image modes work. It also affects the temperature measurement.
7. Push the Autofocus/save button fully down to save an image.
8. Go to http://support.flir.com/tools and download FLIR Tools.
9. Install FLIR Tools on your computer.
10. Start FLIR Tools.
11. Connect the camera to the computer using a USB cable.
12. Import the images into FLIR Tools.
13. Select one or more images.
14. Click Generate report.
15. Click Export to export the report as a PDF file.
16. Send the PDF report to your client.
#T559880; r. AL/45866/46124; en-US
10