
User's Manual

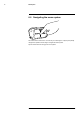


Table Of Contents
- 1 Disclaimers
- 2 Safety information
- 3 Notice to user
- 4 Customer help
- 5 Quick Start Guide
- 6 Description
- 7 Operation
- 7.1 Charging the battery
- 7.2 Turning on and turning off the camera
- 7.3 Saving an image
- 7.4 Recalling an image
- 7.5 Deleting an image
- 7.6 Deleting all images
- 7.7 Measuring a temperature using a spotmeter
- 7.8 Hiding measurement tools
- 7.9 Changing the color palette
- 7.10 Changing the image mode
- 7.11 Changing the temperature scale mode
- 7.12 Setting the emissivity
- 7.13 Changing the reflected apparent temperature
- 7.14 Changing the distance
- 7.15 Performing a non-uniformity correction
- 7.16 Using the camera lamp
- 7.17 Configuring Wi-Fi
- 7.18 Changing the settings
- 7.19 Updating the camera
- 8 Technical data
- 9 Mechanical drawings
- 10 CE Declaration of conformity
- 11 Cleaning the camera
- 12 Application examples
- 13 About FLIR Systems
- 14 Definitions and laws
- 15 Thermographic measurement techniques
- 16 History of infrared technology
- 17 Theory of thermography
- 18 The measurement formula
- 19 Emissivity tables

Operation
7
7.1 Charging the battery
WARNING
For equipment with plugs:
Make sure that you install the socket-outlet near the equipment and that it is easy to get access to.
Follow this procedure:
1. Connect the FLIR power supply to a wall outlet.
2. Connect the power supply cable to the USB connector on the camera.
7.2 Turning on and turning off the camera
• Push the On/off button to turn on the camera.
• Push and hold the On/off button
until the screen goes off (for less than 5 sec-
onds) to put the camera in standby mode. The camera then automatically turns off
after 2 hours.
• Push and hold the On/off button
for more than 5 seconds to turn off the
camera.
7.3 Saving an image
7.3.1 General
You can save images to the internal camera memory.
The camera saves both a thermal image and a visual image at the same time.
7.3.2 Image capacity
Approximately 500 images can be saved to the internal camera memory.
7.3.3 Naming convention
The naming convention for images is FLIRxxxx.jpg, where xxxx is a unique counter.
7.3.4 Procedure
Follow this procedure:
1. To save an image, push the Save button.
7.4 Recalling an image
7.4.1 General
When you save an image, it is stored in the internal camera memory. To display the im-
age again, you can recall it from the internal camera memory.
7.4.2 Procedure
Follow this procedure:
1. Tap the camera screen. This displays the main menu toolbar.
2. Select Images
. This displays an image in the image archive.
#T559918; r. AL/40424/40424; en-US
15