
User's Manual

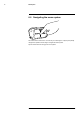


Table Of Contents
- 1 Disclaimers
- 2 Safety information
- 3 Notice to user
- 4 Customer help
- 5 Quick Start Guide
- 6 Description
- 7 Operation
- 7.1 Charging the battery
- 7.2 Turning on and turning off the camera
- 7.3 Saving an image
- 7.4 Recalling an image
- 7.5 Deleting an image
- 7.6 Deleting all images
- 7.7 Measuring a temperature using a spotmeter
- 7.8 Hiding measurement tools
- 7.9 Changing the color palette
- 7.10 Changing the image mode
- 7.11 Changing the temperature scale mode
- 7.12 Setting the emissivity
- 7.13 Changing the reflected apparent temperature
- 7.14 Changing the distance
- 7.15 Performing a non-uniformity correction
- 7.16 Using the camera lamp
- 7.17 Configuring Wi-Fi
- 7.18 Changing the settings
- 7.19 Updating the camera
- 8 Technical data
- 9 Mechanical drawings
- 10 CE Declaration of conformity
- 11 Cleaning the camera
- 12 Application examples
- 13 About FLIR Systems
- 14 Definitions and laws
- 15 Thermographic measurement techniques
- 16 History of infrared technology
- 17 Theory of thermography
- 18 The measurement formula
- 19 Emissivity tables

Description6
6.3 Connector
The purpose of this USB Micro-B connector is the following:
• Charging the battery using the FLIR power supply.
• Moving images from the camera to a computer for further analysis in FLIR Tools.
Note Install FLIR Tools on your computer before you move the images.
6.4 Screen elements
1. Main menu toolbar.
2. Submenu toolbar.
3. Result table.
4. Status icons.
5. Temperature scale.
6. Spotmeter.
6.5 Auto-orientation
The camera has an auto-orientation feature, which means that the camera automatically
adjusts the measurement information on the display to the vertical or horizontal position
of the camera.
Note The auto-orientation feature is enabled by a setting. Select Settings > Device set-
tings > Auto orientation > On.
#T559918; r. AL/40424/40424; en-US
13