
User's Guide
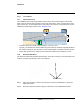


Table Of Contents

2
427-0100-00-12 Version 110 April 2019 16
WARNING - EAR Controlled Technical Data
Operation
This chapter describes how to operate the Saros Dome security camera using the camera’s web page
or the Saros Cloud Web Application.
2.1 Saros Cloud Web Application
To operate and configure a Saros Dome camera using the Saros Cloud Web Application, you must
have a FLIR Cloud account and you must onboard the camera to that account (refer to Onboard the
Camera to FLIR Cloud).
To create a FLIR Cloud account:
Step 1 Using a browser, open https://saro
s.cloud.flir (the Saros Cloud
Web Application). The FLIR Cloud Sign In page appears:
Step 2 Click or tap New to FLIR Cloud? Sign up!. The FLIR Cloud Sign
Up page appears.
Step 3 Enter your first and last n
ame, your email address, and a
password; agree to the privacy policy; and click or tap Sign up. A
message appears confirming registration and you should receive
a verification email.
2.2 Accessing a Camera
To access a camera, do one of the following:
• In the DNA tool, double-click the camera in
the DNA Discovery List and then log in to the camera.
• Type the camera’s IP address in a browser’s address bar (when the
PC and the camera are on the
same network), and then log in to the camera.
• Log in to the Saros Cloud Web Applica
tion and select an onboarded camera:
aOpen https://sar
os.cloud.flir.
b Enter your user name and password. Cameras onboar
ded to your account appear with the
names defined when they were onboarded.
c Select a camera.
The View Settings home page appears.
2.3 View Settings Home Page
The View Settings page displays a live image from the selected video view and a view settings menu
along the left side banner, including Video, Visible, Thermal, I/O, Illumination, and Video Analytics.