
Operations Manual
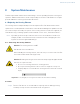
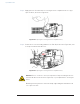
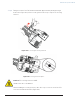
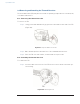
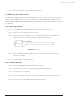
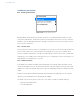
Table Of Contents
- 1 Introduction
- 2 Safety
- 3 System Overview
- 4 Getting Started
- 5 Operating the Fido X4
- 6 Reviewing Data
- 7 Connecting to a Computer
- 8 System Maintenance
- 9 Understanding Alerts
- 10 Specifications
- Table of Figures
- Index

System Maintenance
Step 5: Carefully remove the sensing element and dispose of it safely.
8.1.2 Installing the sensing element
Caution: Breaking a sensing element will create sharp edges and glass shards
that can cut or puncture skin.
• Do not store sensing elements in clothing pockets.
• Do not put a sensing element where someone might sit or step on it.
• Properly dispose of used or broken sensing elements with care to avoid
injury.
Step 1: Verify that the sensing element type marked on the packaging is the type you
want.
Step 2: Remove a new sensing element from the packaging.
Step 3: Hold it by the marked end (Figure 8-1).
Step 4: Insert the unmarked end into the sensing element compartment in the Fido X4
(see Figure 8-5).
Step 5: The sensing element will meet some initial resistance from the O-rings that it
seats into. Push it gently until it is fully seated.
Caution: If you attempt to close the sensing element compartment door before the sens-
ing element is fully seated, you may break the sensing element.
Step 6: Close the sensing element compartment door.
Step 7: Using the display, select the appropriate sensing element type, then select Con-
firm (Figure 8-6).
Figure 8-6: Selecting the sensing element type
56 4226044 (Rev. C) © 2020 FLIR Systems, Inc.