
Installation Guide


FlexStoneProducts.com - 6 - 5/18
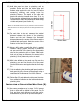
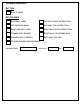
5 INSTALLATION OF SIDE WALL TRIMS (C, D, E, F).
Note: Vertical trim moldings are designed to be installed just outside
the tub, running down to the floor, and contour cut to match the tub
front shape. Optionally, trims can be cut short to rest on top of the
tub.
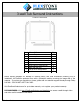
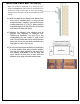
5.1) Place horizontal left wall top mitered trim (Item D)
in place, push into the corner against back wall
trim piece, then level it. Mark a level line on the
wall on the top side of the molding near the outer
end. Set aside this trim piece.
5.2) Measure from the floor to the level mark made in
6.1 to determine the length needed for the vertical
trim piece (Item C). Cut vertical trim piece (C) to
this length,
but do not cut from the pre-mitered
end!
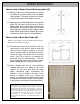
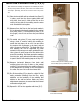
5.3) Fit vertical trim piece (C) over panel and plumb
using a level. If contour cutting this molding to
match the tub shape, do so now. You can scribe
the contour with a compass, or by hand, and cut
with a jig saw or utility knife. The back side of the
trim molding will not be supported by panel
material in the contour cut region outside the tub.
Use a piece of cutoff scrap as a filler behind this
area of the molding. Peel away protective masking
from the trim, apply adhesive and adhere molding
to panel. Secure with masking tape as in Step 5.3.
5.4) Measure horizontal distance from back wall
molding piece to the tip of miter on the vertical
molding. Cut horizontal top trim molding (Item D)
to this dimension by cutting off the end opposite
the miter. Be sure not to cut the mitered end.
5.5) Dry fit the molding (D) in place for a tight fit. Peel
away protective masking from the trim, apply
adhesive on the backside of the molding and
adhere to the wall as before. Make any minor
adjustments necessary to ensure that the mitered
end makes a tight joint.
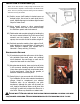
5.6) Repeat 6.1-6.5 for the opposite wall trims (E, F).
Vertical trim installed outside tub, and contour
cut to match tub shape
Vertical trim installed to top of tub
Contour cutting the trim molding to match
the tub shape gives a professional look