
Installation Instructions

FlexStoneProducts.com - 1 - 1/15
Remodel Trim Kit Instructions
Please inspect packages for damage or missing pieces, and read instructions carefully prior to
installation. All FlexStone products come with a protective masking covering the image side of the
material. If you have any questions or issues, please call our customer support Monday through Friday
8:00 AM – 5:00 PM MST at 877-941-3662.
Visit FlexStoneProducts.com for up-to-date manuals, or to register your product warranty.
RECOMMENDED: Visit http://FlexStoneProducts.com/installation to access a walk-through video
and other useful installation information.
1. The Remodel Trim Kit allows FlexStone to be used
over
existing tile. Tile
should be in good shape, clean and dry, and wall surfaces should be flat
(i.e. remove any accessories that would interfere with the FlexStone
panels.) Kit contains 4 lengths of 96” trim, and pieces will need to be cut
to proper length and mitered according to the FlexStone Bath Kit being
installed
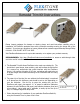
2. The return lip of the trim (the one without the finished edge) is oversized
to fit almost any tile thickness, and should be cut to size depending on
your tile thickness. Size the lip to cover the existing tile, plus the
FlexStone wall panel, plus approx. ¼” of space for adhesive (adhesive
between tile and FlexStone wall panel, and adhesive between panel and
trim molding.) Use a table saw, if available, to easily rip the trim lip to
size, or a straight edge and utility knife.
3. Follow instructions for installation of your particular FlexStone Bath Kit,
using the Remodel Trims in place of std. trims.
Cut lip to size depending on
tile thickness