
Installation Guide

Accent Strip Instructions
Please inspect packages for damage or missing pieces, and read instructions carefully prior to
installation. All FlexStone products come with a protective masking covering the image side of
the material. If you have any questions or issues, please call our customer suppport
Monday – Friday 8:00 a.m. – 5:00 p.m. at 877–941–3662
RECOMMENDED:
Visit http://FlexstoneProducts.com/installation to access a
walk-through video and other useful installation information.
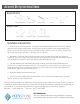
Required Tools
Helpful Tools
Installation of Accent Strip
1. Accent Strip Trims can be placed at any height on the FlexStone Bath Kit surround, and are adhered
directly over the FlexStone wall panels. Accent Strips may also be used to cover a seam between two
panels, such as the case where you have purchased two kits in order to run to the ceiling. Accent Strips
are 6” high, and the kit contains 2 ea. 48” long, and 1 ea. 60” long.
2. Back Wall: Cut the back wall Accent Strip (the 60” piece) to proper length, peel away protective
masking for the Accent, apply construction adhesive to the back side of the Accent, and adhere it directly
over the FlexStone wall panel. Secure with painters’ tape while adhesive cures.
3. Left Wall: Measure from the outside vertical trim molding to the face of the installed back wall
Accent, then cut a 48” Accent piece to this size. For the best look, you may wish to cut a little from the
inside side of the Accent until the pattern matches up in the corner, then cut from the outside side to
proper length. Adhere as with back wall Accent.
4. Right Wall: Repeat as with left wall Accent.
5. Seal top and bottom edge joints, as well as inside corners where Accent meets Accent, with 100%
silicone, as with the rest of the surround.
Tape Measure Caulk Gun LevelUtility Knife Pencil
Clean Cloth Denatured AlcoholPainter’s Tape