EN/CN-A01 Finder 3 发现者3 用户使用手册 USER GUIDE 中文P20 This guide is only applicable to FLASHFORGE Finder 3 3D printer 本手册仅适用于闪铸科技 发现者3 3D打印机
Content Notes 02 Legal Statement 02 Equipment Parameters 03 Unpacking 04 Chapter 1 Equipment Introduction 05 1.1 - Product Introduction 05 1.2 - Kit Contents 06 Chapter 2 Preparation for Printing 07 2.1 - Assemble filament 07 2.2 - Build Plate 08 2.3 - Power On 08 2.4 - Leveling Build Plate 09 2.5 - Loading Filament 11 2.6 - Software Installation 11 Chapter 3 First Print 12 3.1 - Print 12 3.2 - Unloading Filament 13 3.3 - Wi-Fi Connection 13 3.
Notes 1. Do not make any modifications to the printer. To avoid personal injury or property damage please ensure your operation followed by the Manual. 2. Dress properly. Do not wear loose clothing or jewelry. Keeping your hair, clothing and gloves away from moving parts. 3. Do not directly touch the nozzle and build plate to avoid high-temperature burn. 4.
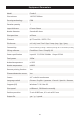
Equipment Parameters Model Finder 3 Print volume 190*195*200mm Forming technology FDM Extruder quantity 1 Layer thickness 0.1mm-0.4mm Nozzle diameter Standard 0.4mm Print precision ±0.2mm Filament φ1.
Unpacking 1. Open the box, take out the user manual and the USB flash disk. 2. Remove the foam. 3. Lift the printer and put it on the desk, then take Finder 3 out of the plastic bag. 4. Remove the top foam, there should be a power cable included. 5. Take out the foam under nozzle. 6. Hold the platform and lift it carefully to remove the foam below it. 7. Discard the protective tapes all around. 8. Cut the cable ties which for fixing X-axis and Y-axis synchronous belt. 9.
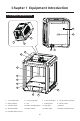
设备简介 Chapter 1 第一章 Equipment Introduction 1.1 Product Introduction 17 16 13 11 12 14 15 1 2 3 4 5 6 7 10 8 9 1. Y-axis Guide Rail 2. X-axis Guide Rail 3. Z-axis Guide Rail 4. Limit position assembly 5. Glass platform 6. Clip 7. Leveling Nut 8. Touch Screen 9. USB Stick Input 10. Power Voltage Switch 11. LED Light 12. Nozzle 13. Turbofan Baffle 14. Power Switch 15. Power Input 16. Spool installation port 17.
1.
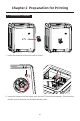
设备简介 Chapter 2 第一章 Preparation for Printing 2.1 Assemble filament 1. Install the material rack on the back of printer. Press the handle 2. Insert the filament into the intake, pull out the PTFE tube from extruder; Then press the handle to push filament into filament feeding roller.
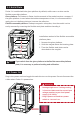
2.2 Build Plate Finder 3 is installed with the glass platform by default, while users can also use the flexible removable platform. Glass platform: The bottom is flatter, but the removal of the model requires a scraper; If the glass platform is used when the ambient temperature is low, it is recommended to apply glue on it before printing to increase the adhesion.
2.4 Leveling Build Plate Click [settings]-[Language] to switch the language. How to use the nuts Build plate goes up Build plate goes down Rotate the nuts clockwise Rotate the nuts Anticlockwise Raise the build plate to reduce the distance between the nozzle and build plate. Lower the build plate to increase the distance between the nozzle and build plate. 1.
2. Lightly pull the A4 paper and feel the friction. If the friction is too big to move, tap [↓] to increasethe distance between nozzle and build plate; if the friction is too small, tap [↑] to reduce the distance between nozzle and build plate. It is better that pull the paper to feel the significant frictional resistance until the slight scratches appear without damage. Tap [Next] to do the second level point. 3.
2.5 Loading Filament Note Please ensure that the filament has been loaded in an appropriate approach. Tap [Control] - [Load]. It starts to load the filament when the targeted temperature reached. Do not stop loading when the nozzle extrudes the filament. It is suggested that extrude the filament evenly then tap [OK] to back to the homepage. 2.6 Software Installation Method 1: Find the FlashPrint installation package in the USB disk and select the version corresponding to your system to install.
第一章3设备简介 Chapter First Print Suggestions 1. Ensure that the build plate has been leveled before printing. 2. Please clean extruder before printing (Load the filament for a while to extrude all the melted filament you printed last time out of the extruder). 3. Do not leave the printer unattended during operation. 3.1 Print Decompressed the slicing software package in the USB flash drive and install it to your computer.
3.2 Unloading Filament Please follow steps below if you need to unload filament in daily use. Tap [Control] - [Unload]. When the filament unload out of the filament feeding port, the unload operation is finished. Note After unload completed then load again, it is filament replacement. 3.
Tap [Settings] - [Wi-Fi], open the WIFI function. Choose the Internet and save the password. 3.4 Connect Printer by Wi-Fi 1. After the Wi-Fi connected successfully, tap [Info] and check the IP Address. 2. Open the FlashPrint 5, click [Print] - [Connect Machine], input the IP address and click the connect. 3. Click [Tools] - [Multi-Machine Control], you will see the statue of device.
3.5 Firmware Upgrade Method 1: Get the firmware files: Connect with aftersales and send email to support@flashforge.com 1. Copy the firmware into the blank USB flash disk. 2. Plug in the USB flash disk into the USB port of printer and reboot the printer, waiting for the upgrade process finished. 3. Plug out the USB flash disk after hearing three beeps, reboot printer again. 4. After the upgrade completed, please delete the firmware file in the USB flash disk to avoid upgrading repeatedly next time. Method 2: 1.
3.6 Printing Notice 1. The adhesion of glass build plate may decrease after long time using. Please apply proper amount of glue to keep and improve the adhesion. 2. Warping issues may occur when print ABS filament in cold environment, you may use glue to enhance the adhesion. It's not recommended to print ABS filament at extremely low temperature environment, as print will fail when printed model getting away from the build plate. 3.
第一章 设备简介 Chapter 4 FAQ Q: What if the files are garbled and cannot be read? A: 1. The format of files after slicing is not compatible; 2. Repair the model before slicing. Q: What if the model warps or is unable to stick to the build plate? A: 1. The temperature of the build plate was too low; please rise its temperature; 2. Filament failed to adhere to the build plate, use glues to enhance the adhesion; 3.
Q: What if the axis cannot be moved? A: 1. Check the wire of the electric motor; 2. Contact us by email listed. Email: support@flashforge.com Q: What if the files on the USB flash disk cannot be identified? A: 1. Clean and wipe the USB flash disk; 2. Format the USB flash disk; 3. Replace the USB flash disk. Q: What if knock and noise occur when nozzle returning to zero point? A: 1. Check whether the zero sensor is knocked and broken; 2.
设备简介 Chapter 第一章 5 Support and Service Flashforge team is on standby and ready to help you with any challenges you may have with your 3D printer. If the issues or questions are not covered in this User Guide, you can seek for solutions on our official website or contact us via telephone. There are solutions and instructions to common issues that can be found in our knowledge base. Have a look first as most basic questions are answered there. http://www.flashforge.
目录 使用须知 21 法律申明 21 设备参数 22 开箱 23 第一章 设备简介 24 1.1 - 整机介绍 24 1.2 - 装箱清单 25 第二章 打印操作 26 2.1 - 丝料安装 26 2.2 - 打印平台 27 2.3 - 通电 27 2.4 - 调平 28 2.5 - 进丝 30 2.6 - 软件安装 30 第三章 首次打印 31 3.1 - 打印 31 3.2 - 退丝 32 3.3 - 连接Wi-Fi 32 3.4 - Wi-Fi连接电脑 33 3.5 - 固件更新方法 34 3.
使用须知 1. 请勿自行对打印机进行任何改装。请按照说明书操作,避免造成意外人身伤害和财产损失。 2. 在使用打印机时,请勿穿戴围巾、手套、珠宝装饰等容易卷入设备的物件。 3. 请勿在打印机工作时接触喷嘴和打印平台,防止出现高温烫伤。 4. 请勿将打印机放置在有可燃性气体、液体及灰尘的环境中(打印机运行产生的高温有可能会与 空气中的粉尘、液体、可燃性气体反应引发火灾)。 5. 请勿将打印机放置在振动较大或其他不稳定的环境内,打印机晃动会影响打印质量。 6. 儿童及未经培训的人员请勿单独使用设备。 7. 请在通风环境下操作此设备,部分耗材打印过程中可能产生异味。 8. 请勿在开机状态下手动快速移动喷头和打印平台,避免打印机故障。 9. 请勿利用该打印机进行违法犯罪的活动。 10. 请勿利用该打印机制作食物储存类产品。 11. 请勿将打印模型放入口腔。 12. 在打印机进行进退丝操作时,喷头和平台请至少保持50mm的距离(距离过近,有可能会造成 喷头堵塞)。 13.
设备参数 型号 发现者3 成型尺寸 190*195*200mm 成型技术 FDM 喷头数量 1 层厚 0.1mm-0.4mm 喷嘴直径 标配 0.4mm 精度 ±0.2mm 打印材料 φ1.75mm PLA / PETG / TPU 支持格式 stl / obj / amf /3mf / fpp / bmp /png / jpg / jpeg 打印方式 内存打印 / U盘连接打印 / Wi-Fi联机打印 可兼容切片软件 FlashPrint / Cura / Simplify 3D 电源规格 输入:AC 115/230V 50/60Hz 总功率 350W 热床温度 ≤110℃ 喷嘴温度 ≤260℃ 断电续打 支持 断料检测 支持 屏幕 4.3寸彩色触摸屏 语言切换 中文 / 英语 / 日语 / 法语 / 西班牙语 / 德语 电脑操作系统 Windows 7/10 / Mac OS 打印速度 ≤180mm/s,正常为50-80mm/s 定位精度 Z轴:0.0025mm,X/Y轴:±0.011mm 输出格式 .gx / .
开箱 1. 打开包装,取出说明书及U盘。 2. 拿起在运输中起保护作用的纸塑壳。 3. 取出打印机放置于桌面上,去除包装袋。 4. 取出顶部装有电源线的纸塑壳。 5. 从机器正面取出喷嘴下方的纸塑壳。 6. 用手托住打印平台,缓缓将其提升,以便于取出平台下方的纸塑壳。 7. 撕除机器四周的保护贴纸。 8. 剪断固定X轴同步带、Y轴同步带的扎带。 9. 剪断用来固定导轨的扎带。 10. 剪断用来固定平台的扎带。撕掉平台上的保护膜。 11.
第一章 设备简介 1.1 整机介绍 17 16 13 11 12 14 15 1 2 3 4 5 6 7 10 8 9 1. Y轴导轨 2. X轴导轨 3. Z轴导轨 4. 平台限位卡扣 5. 打印平台 6. 固定卡扣 7. 调平螺母 8. 触摸屏 9. U盘插口 10. 电源拨码窗口 11. 喷头灯 12. 喷嘴 13. 涡轮风扇出风口 14. 电源开关 15. 电源输入端口 16. 丝盘固定轴安装接口 17.
1.
第一章打印前准备 设备简介 第二章 2.1 丝料安装 1. 将丝盘固定轴安装于打印机背部的安装接口上。 按压把手 2.
2.2 打印平台 Finder 3 默认安装玻璃平台,用户也可使用柔性可移除平台。 玻璃平台:底部更平整,但移除模型需要借助铲刀;若环境温度较低时,使用玻璃平台建议打印前 涂抹胶水,以增加粘附力。 柔性可移除平台:利用磁性吸附,取下柔性钢板折弯可取下模型。 3 2 1 注意 柔性可移除平台板的安装方式: 1. 将玻璃平台取下; 2. 将磁贴贴到加热板上方; 3. 柔性钢板可吸附于磁贴上。 若从玻璃平台切换到柔性可移除平台板时需要做调平与校准动作。 2.
2.4 调平 在触摸屏上依次点击【设置】-【语言】调整语言。 如何通过调平螺母调节打印平台 打印平台上升 打印平台下降 顺时针旋转螺母 逆时针旋转螺母 打印平台上升,喷嘴与平台之间的间距变小 打印平台下降,喷嘴与平台之间的间距变大 1.
2. 轻轻滑动A4纸,若没有明显摩擦阻力,点击【↑】,缩小喷嘴与打印平台之间的距离;反之, 点击【↓】,增加喷嘴与打印平台之间的距离,直至滑动A4纸有明显摩擦阻力,能拖动A4纸但 不会划破。点击【下一步】,完成第一点调平。 3. 当喷头移动到第二个调平点,轻轻滑动A4纸,若没有明显摩擦阻力,顺时针旋转调平螺母,缩 小喷嘴与打印平台之间的距离;反之,逆时针旋转调平螺母,增加喷嘴与打印平台之间的距 离,直至滑动A4纸有明显摩擦阻力,能拖动A4纸但不会划破。点击【下一步】,完成第二点调 平。 4.
2.5 进丝 注意 在进丝前确认耗材安装正确,没有打结或卡住! 在首界面点击【控制】-【进丝】。喷头加热到预定的温度后会自动开始进丝。当喷嘴开始出丝时 请勿停止进丝,直到耗材均匀出丝为止,点击【确定】,返回主界面。 2.6 软件安装 方法一 在U盘中找到FlashPrint软件安装包,选择对应的系统版本进行安装。 方法二 从官方网站 www.sz3dp.
第一章 首次打印 设备简介 第三章 打印建议 1. 打印开始前请确保打印机已经完成调平; 2. 打印开始前请将喷头内的耗材清理干净(喷头内可能残留少量耗材,请进丝一段时间,确保上 一次打印的耗材已全部挤出); 3. 不允许在长时间无人看守的情况下使用3D打印机。 3.
3.2 退丝 在日常使用中,如果需要更换耗材,请按下列步骤操作。 在首界面点击【控制】-【退丝】,等待自动退丝完成后点击【返回】完成退丝。 注意 退丝完成后执行进丝操作,即可完成耗材更换。 3.
依次点击【设置】-【无线网络】,打开Wi-Fi功能。选择一组Wi-Fi,并输入密码,连接Wi-Fi。 3.4 Wi-Fi连接电脑 1. Wi-Fi连接成功后,点击【信息】,查看IP地址。 2. 打开切片软件FlashPrint 5,点击【打印】-【连接机器】,输入设备IP地址,点击【连接机器】。 3.
3.5 固件更新方法 方法一 固件下载:联系售后邮箱 support@flashforge.com 1. 2. 3. 4. 将新固件包拷贝到空白的U盘中; 将U盘插入打印机,重启打印机,打印机将自动更新,等待“更新完成”提示; 蜂鸣3声后拔掉U盘,重启打印机; 更新完成后删除U盘中的固件,避免下次开机重复更新 。 方法二 1. 将打印机连接到网络(详见3.3 连接Wi-Fi); 2.
3.6 打印注意事项 1. 玻璃平台长期使用后粘附力将有所下降,请适量涂抹胶水增加粘附力。 2. 在低温环境中,打印ABS耗材容易发生翘边等异常情况,可涂抹胶水增强粘附力。不建议在温 度过低的环境打印ABS材料,模型容易从平台脱离。 3. 打印平台因在打印过程中可能存在抖动导致平面度发生变化。打印时请注意第一层的粘附是否 正常;若不正常,请重新调平。 4. 若打印成品在尺寸上有较大误差,请先确认同步带安装是否异常,是否太宽松或者过紧。若 是,请调节至合适状态。 5. 若Z轴高度尺寸有误差,请对Z轴进行精度补偿。 6. 建议打印环境温度为18-30℃,过高或过低的环境温度,都会影响打印质量。 7. X轴导轨长期使用后润滑度将有所下降,请适量涂抹润滑脂增加润滑度。 第一章 故障检修 设备简介 第四章 Q: 文件乱码,读取不了? A: 1. 文件切片格式不匹配; 2. 切片前修复模型。 Q: 打印模型起翘,粘不住打印平台怎么办? A: 1. 平台温度设置太低,请加高平台温度; 2. 材料本身不粘平台(建议涂抹胶水,增强粘附力); 3.
Q: 喷嘴不加热? A: 1. 查看温度显示是否异常,若异常则热敏电阻损坏,需要更换热敏电阻; 2. 温度显示正常不加热,加热管线损坏,需更换加热管线。 Q: 模型打印尺寸不良怎么办? A: 确认同步带是否异常松或太紧,调整到合适状态。 Q: 轴无法运动。 A: 1. 检查电机线束是否插好; 2. 联系技术支持。 Q: U盘中文件无法识别? A: 1. 擦拭U盘;2. 格式化U盘;3. 更换U盘。 Q: 回零一直在撞击 ,停不下来,有异响产生。 A: 1. 确认回零传感器是否有问题,是否有碰撞到传感器; 2. 检查线路是否异常,手动按压传感器查看是否停止; 3. 联系技术支持。 Q: 模型打印偏移怎么办? A: 1. 确认同步带张紧力,确认同步带是否安装错误; 2. 打印模型重新切片; 3. 降低打印速度; 4. 确认机器使用环境温度是否超过机器限定最高温度30℃。 Q: 机器通电就烧坏了。 A: 开关电源拨码不正确,检查电压是否拨到正确的电压值。 Q: 模型打印拉丝严重。 A: 1. 适当调低打印温度5-10℃; 2.
第一章帮助与支持 设备简介 第五章 闪铸专业的售后服务人员及业务员随时为您待命,非常乐意为您解决在你使用过程中遇到 的任何问题。如果你的问题从用户手册中找不到答案,你可以进入我们的官方网站来搜索问题 的解决方案,当然您也可以通过电话或QQ联系我们。 在我们的官网中可以找到一些常见问题的说明和解决方法。您的许多问题都可以在闪铸科 技官方网站 www.sz3dp.
Follow us Zhejiang Flashforge 3D Technology Co., Ltd. Address: No.518 XianYuan Road, Jinhua City, Zhejiang Province, China Service Hotline: +86 579 82273989 support@flashforge.