
User Manual


GuiderⅡ User Guide | www.flashforge.com 400-699-1063
59
done.
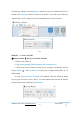
Print When Slice Done: If you print via USB cable, you can check the box, while if
you print via USB, you should not check the box.
Machine Type: FlashForge Guider
Ⅱ
Supports: If you print a model with supports, you should click the inverted triangle
and select [Enable].
Raft: You are suggested to select [Enable].
Resolution: You are suggested to select [Standard]
More Options: You are suggested to keep them default.
Click [OK] to select the path to save the Gcode file. You can rename the file as you
like and save it as a .g or .gx file, click [Save] to generate a Gcode file.
7-6
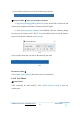
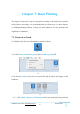
Note: .gx files are available for preview while the .g files are not. They are displaying
as follows:
g. Files gx. Files
7-7
Next, we are going to print the model.
7.2 Print Methods
After generating the Gcode file, you can transfer it to your Guider Ⅱ. You can transfer
the file through USB cable and USB stick.
7.2.1 Print from Computer (USB connection)
①Connect your GuiderⅡ with your PC via a USB cable.