
User Guide

Using Your Smart Chaser: How to Set Your Chase Sequence
*Important: Anytime that you change the sequence you MUST unplug the controller box and then plug it back
in AFTER you have set the dip switch sliders to the new sequence code for the change to take effect.*
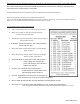
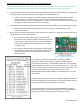
1. To set your chase sequence, first look at the chase sequence label (printed at the bottom of this page and
on the top of your controller box) to see which pattern you would like to use.
• If you are not sure, see pages 5-6 of this manual for descriptions of the effect each available
pattern creates. For more detail, go to our website at www.FlashTrackLighting.com, to see
animated examples of each available pattern. IF you are still not sure, contact us and we can help
you figure out which sequence to use for your display.
2. Then, find the corresponding Code Setting (the associated sequence of 0s and 1s) on the Sequence Label.
• When looking at the code setting (the sequence of 1s and 0s), 1 represents up/on and 0
represents down/off.
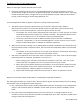
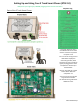
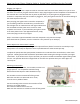
3. Once you have found the setting for the chase sequence you want to run, open the controller box and set
the dip switch to your desired sequence.
• To locate the dip switch, open the top cover of the box.
The dip switch has 4 sliders located in the bottom right end
inside the box. You may need a pen or other small item to
change the positioning of the individual slides, since they
are rather small.
• To set the dip switch to your desired setting, simply adjust
the 4 sliders on the dip switch to the up-on-1 positions and
down-off-0 positions that correspond with the sequence
you want to run.
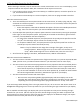
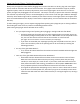
For example: To select a 2 Track Chase, the setting is “1000”.
Adjust the 4 sliders on the dip switch, going from left to right, to
correspond to that setting. The first slider should be in an on/upward
position (flipped up), to turn it “on” as indicated by the “1” in the code
setting. (The first slider is located at the left end of the dip switch.) The
rest of the sliders (sliders 2, 3, and 4) need to be set to the
downward/off position (flipped down), as indicated by the “0”s in the
code setting.
Anytime that you change the sequence you MUST unplug the controller
box and then plug it back in AFTER you have set the dip switch sliders to
the new sequence code for the change to take effect.
It is also critical that you unplug the controller BEFORE touching the
board to avoid shock. There are multiple pieces on the board that will
shock you if you handle them while the controller is running.
3TSC-10 Manual p9