
User Guide

Using Your Smart Chaser: Plugging Lights In, Setting Speed, and Mounting the Controller
Plugging your Lights in
Always plug your lights into a separate outlet or extension cord first to test them, THEN, once you are sure
that there are no shorts, plug the controller box in. Next, plug the lights into the receptacles on the bottom of
the controller box. This controller has no power on/off switch, so if your lights are plugged into the
controller’s receptacles, and your controller is plugged in, then your lights should turn on and off according to
the chase sequence that is set.
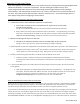
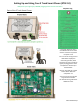
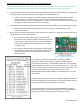
Once you plug your lights into the controller receptacles, if
you are looking inside the controller box, you should see a
few red lights turn on inside the box. Each light indicates that
the associated track has power and is turned on. Each
receptacle is one track. If you would like your lights to chase
in the same pattern but in the opposite direction, simply
reverse the plug-in order of your lights.
Keep in mind that a typical household circuit and receptacle is only rated at 15 amps.
(This should not be a problem, since this controller is only rated for up to 10 amps.)
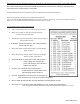
How to Adjust Your Chase Pattern’s Speed
For most chase patterns, the speed range can be adjusted from 1/20th of a second to 2 seconds per step.
Slow patterns can usually be adjusted to select a speed between 2 and 6 seconds per step.
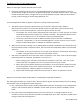
To adjust the speed, twist the speed pot dial, located on the underside of the controller box, at the center
right end. Twisting the dial left will slow the speed down while twisting the dial right will make your lights
chase faster. If you lift the cover of your controller, you will see red LED track indicator lights flashing inside
the box. The speed at which the red lights flash on and off is the speed at which your chase lights are
currently set.
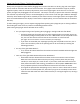
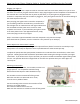
Mounting the Controller
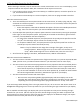
When mounting the controller, the controller must be in an
upright position. The receptacles should be facing
downward and the Sequence Label should be on top.
The controller must be mounted off of the ground.
While the controller can withstand rain or snow,
it cannot sit in a puddle of water.
Use the mounting holes to secure the controller off the
ground, in an upright position.
You can do this with screws or wire ties.
Make sure the controller is at least 12 inches off the ground.
3TSC-10 Manual p10