
User's Manual
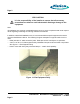
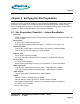
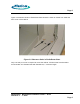
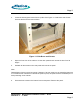

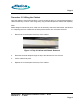
Table Of Contents
- toc
- Issue Date: 08- 04- 2003
- Overview
- Verifying the Site Preparation
- 2.1. Site Preparation Checklist •24 Indoor BaseStation
- 2.2. Preparing the Floor
- Installing the Cabinet
- Connecting the Power System
- 4.1. Routing the Cables
- 4.2. Connecting to Power and Ground
- Connecting the Core Network Cables
- Connecting the Antennas Cables
- Installing the Alarm Connections
- Powering Up the Cabinet
- Powering Down the Cabinet
- Verifying the Installation
- 10.1. Verifying the Physical Installation
- 10.2. Verifying the Base Station Operation
- RadioRouter BaseStation Site Preparation Punchlist
- RadioRouter BaseStation Installation Punchlist
- tables

Page 7
3.
Locate the side support braces from the pallet. See Figure 3.1 Side Brace and Screws.
Unscrew the braces and remove them.
Figure 3.1 Side Brace and Screws
4.
Open the front door of the cabinet. Lift the door upwards and remove the door from its
hinges.
5.
Unfasten all the screws on the rear panel and remove the panel.
Note:
Reinstallation of the rear panel is optional. However, if the rear panel is to be reinstalled and there
is not sufficient rear clearance to reinstall the panel in place, the panel must be reinstalled prior to
final positioning of the cabinet.
6.
Unscrew the 8 screws on the bottom front access panel. Remove the panel.
RadioRouter
®
BaseStation Installation Guide — Draft
Version 0.5 - © 2003
Page 7