
Instructions / Assembly
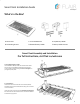


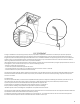

3. Attach Top Battery Holder
Align the arrow on the Top Battery Holder with the arrow on the
Smart Vent body.
Push the Top Battery Holder down over the batteries and screw in
both screws (note: screws are pre-inserted into the Top Battery
Holder).
If you’ve installed the Top Battery Holder correctly, you should see
the Smart Vent’s lights turn on and the louvers move. If you do not
see these actions, remove the Top Battery Holder, wait five
minutes, and install again.
4. Mount or Insert the Smart Vent
Floor installation
Place the Smart Vent into the duct opening on the floor.
Wall and Ceiling
Insert the Smart Vent into the wall or ceiling. Insert the mounting
screws into the mounting slot on the two ends of the vent. Align the
screws in the mounting slot with the existing mounting holes in the
wall or ceiling.
If the mounting holes in your wall or ceiling are stripped or loose:
Use drywall anchors (not included) and/or use the alternate
mounting holes. If you use the alternate mounting holes, we
recommend using drywall anchors and 4 mounting screws (not
included).
Take care to ensure that the Smart Vent is securely fixed to the wall
or ceiling. If you’re unsure how to proceed with installation, contact
a local handyman or contracting service. Flair is not liable or
responsible for damage or injury resulting from incorrectly installed
Smart Vents.
5. Attach Faceplate
Attach the faceplate with the two screws. Install any other Smart
Vents.
6. Digital Installation
When you’re finished installing your Smart Vents, you can start
digital setup in the Flair App (flair.co/ios or flair.co/android). You
can also access Flair via the Web App at my.flair.co. For further
installation instructions, please visit flair.co/welcome
2