Model: FDX 3.0 Owner’s Manual R VISIT OUR WEBSITE: WWW.THEFITDESK.COM OR CALL US AT 1-336-423-5029 MONDAY - FRIDAY 9 A.M. - 5 P.M. EST DISTRIBUTED BY FD PRODUCTS LLC.
TABLE OF CONTENTS Introduction.............................................................1 Operational Instructions.......................................12 Safety Warnings.....................................................2 Meter....................................................................14 Customer Support..................................................3 Set-Up / Storage..................................................15 Tools / Hardware / Knobs.......................................
SAFETY WARNINGS - URGENT PLEASE READ THIS SECTION WE WANT YOU TO SAFELY USE THIS PRODUCT 1. Read the entire manual before assembling and using the equipment. Safe use can only be achieved if the equipment is assembled, maintained and used properly. All users of the equipment must be informed of all warnings and precautions. 2.
CUSTOMER SERVICE QUESTIONS NEED HELP? CONTACT US FIRST 1-336- 423-5029 MONDAY - FRIDAY 9 A.M. - 5 P.M. EST EASY TO USE CUSTOMER TICKETING Step 1: www.thefitdesk.com Step 2: “Support” Step 3: “Submit A Support Ticket” customerservice@thefitdesk.com FOR FASTEST POSSIBLE SERVICE PLEASE HAVE AVAILABLE Model # (refer to this manual) - Serial # (located on tubular base safety sticker) WWW.THEFITDESK.
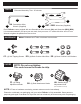
TOOLS Estimated Assembly Time : 30 minutes BB1 AA AA BB2 AA. Screwdriver Allen BB1 Wrench (Supplied) BB2 BB1. / BB2. Wrenches (Supplied) Each FitDesk® comes equiped with one Screwdriver Allen Wrench (AA) and Wrenches (BB1) (BB2). It is recomommended if you have your own tools, that you use a 1/2” socket with drive and a 15 mm Wrench to tighten the pedals from time to time. HARDWARE Note: Hardware and Tools not shown to actual size. DD CC CC. (2) Self-Tapping Screws KNOBS EE DD.
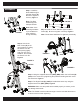
PARTS B A C A. Saddle C. Saddle Height B. Pedals Adjuster E E. Saddle Back Cushion F G F. Desk Frame Support G. Saddle Post (Pre-Assembled on Desk) D. Saddle Back Frame I R J H K H. Resistance Bands I. Rear K. Main J. Front Stabilizer Stabilizer Frame DESK PARTS & COMPONENTS L M M. Meter SCAN TI ME SPEED ODO DI ST CAL MODE RESE T L. Desk Strap N P Q P. Massage Bar SET Q. Meter Holder 5 N.
BEFORE YOU BEGIN Download the FREE BILT App TM ® Search FitDesk and assemble this product with easy to understand 3-D instructions TM BILT equips you with 3D, interactive, step-by-step instructions for a quicker assembly, repair, maintenance and warrenty experience. For Android, Apple, Tablets and Phones ASSEMBLY NOTE: Before assembly please check all parts carefully. We take great care to deliver quality products that will last for years.
ASSEMBLY K Step 1: Install the Rear Stabilizer (I) to the Main Frame (K). Be sure to tighten it securely. Figure 1 K J Note: The Rear Stabilizer (I) has transport wheels. I FIGURE 1 Note: Most of the mounting hardware is pre-installed for easy matching during assembly. FIGURE 2 Step 2: Install the Front Stabilizer (J) to the Main Frame (K). Be sure to tighten it securely. Figure 2 Note: Check Base Stabilizers for tightness periodically.
ASSEMBLY FIGURE 7 HH FIGURE 6 G C G Step 6: Assemble the Saddle (A) to the Saddle Tube (G). using attached wrench (BB1) Figure 6 Step 7: To attach the Saddle (A) and Saddle Tube, (G) loosen the Saddle Tube Adjuster Knob (HH). Figure 7 Note: Make sure the lock nuts are extra tight. Note: The FitDesk® is supplied with an optional Saddle Height Extender (C) for increased leg extension if needed. It is recommended for use if you are taller than 5 feet 9 inches, or 175cm.
ASSEMBLY Step 10: Place one Resistance Band Handle through the opening in the frame, (K) then hang the handles (H) on the Resistance Band Hooks (3242) like shown. Be sure to place the Tube into the metal loop. Figure 10 K WARNING: The Resistance Bands are for light use only. Do not overstretch the Resistance Bands. N H FIGURE 10 FIGURE 11 K Step 11: Place the Desk (N) over the bikes Main Frame (K) tighten the two Allen Bolts and Washers using attached Allen Wrench (AA).
ASSEMBLY FIGURE 15 GG DETAIL P L Step 15: Attach the Massage Bar (P) to the Desk using the Desk Knobs (GG). The Massage Bar (P) can be set in three different positions above horizontal. Choose a desired height, but be sure to align each Support Arm in the same position on each side. Tighten the Desk Knobs (GG) securely. Figure 15 L GG WARNINGS AND LABELS NOTE: Read all warning stickers before operating this product.
WARMING UP WARNING: Always check with your physician before starting any type of exercise program. Before you use the FitDesk®, it is advisable to warm up and stretch your muscles. Simple warm up exercises and stretches can help you be more efficient and safer during your time on the FitDesk® . STRETCHING Hold each stretch 10 to 30 seconds. If you feel you need more, stretch the other side and return for another set of stretching. • The stretch should be strong, but not painful. • Do not bounce.
OPERATIONAL INSTRUCTIONS NOTE: Before operating please read carefully MASSAGE BAR L To adjust the Massage Bar, (P) loosen the left and right knobs, (GG) then lift or lower to the best position. Tighten the knobs (GG) when done. Figure 1 P GG N FIGURE 1 FF RIDE POSITION AND ADJUSTMENTS The Desk (N) and ride position can be adjusted by loosening the knobs (FF) located on the underside of the Desk Slide. Slide the Desk (N) forward or back to a comfortable position, then tighten the knobs (FF).
NOTE: Before operating please read carefully 6 1 78 2 LOW LOW T E NS HIGH TE N SI IO N C O N TR O H RESISTANCE BANDS Your FitDesk® is supplied with a Premium Latex Resistance Band (H). Having this proven fitness staple near you throughout the day is a great option for more exercise. Here we want you to take a look at ways you can use your FitDesk® Resistance Bands and also show you how to maintain them for maximum safety.
METER / OPERATION FitDesk R BATTERY INSTRUCTIONS SCAN CAL TIME SPEED ODO DIST MODE RE SE T SET INSTRUCTIONS: 1. Mode button advances the meter. a. Time in use b. Speed c. Distance d. Calories burned e. Total miles on FitDesk® M 2. Reset button allows for monitor to be reset for time、 distance and calories mode. a. Stop pedaling then push reset to reset each Mode. 3. Scan will automatically start at each Mode. a. To Stop Scan press mode button again. b.
SET UP / STORAGE This model FitDesk® uses a quick release frame unlock design. As a safety precaution please use the technique shown here when opening and closing frame. Figure 1. TO OPEN: Pull pin on frame support while placing foot on base. Open frame then release pin, then pull desk toward you. FIGURE 1 OPEN FIGURE 1 OPEN Place Feet As Marked B FIGURE 2 CLOSE Figure 2. TO CLOSE: FIGURE 2 CLOSE 1. Remove any items on desk. 2. Put foot on base, pull pin and close frame folding desk in.
MAINTENANCE AND TROUBLESHOOTING The integrity of the FitDesk® bike can only be maintained when it is regularly maintained for damage and wear. Special attention should be given to the following. HARDWARE Verify that all bolts are present and properly tightened. TIP: Inspect nuts, screws and knobs on a weekly basis. FRAME, SEAT, SEAT MOUNT Properly adjust seat back angles for multiple position use. NOTE: Check frame, seat, seat mount, desk mounting areas for wear.
WARRANTY This limited warranty is applicable to each original end-customer (hereinafter “Customer”) purchasing the FitDesk® Model: FDX 3.0 consisting of the structural metal frame (hereinafter the “Structural Frame”) and various other non-frame components (hereinafter the “Non-Frame Parts”) sold by FD Products, LLC (hereinafter “Company”) for Customer’s own use and not for resale. The Structural Frame and Non-Frame Parts are collectively referred to herein as the “Products”. 1.
WARRANTY 1.1. IF A COMPANY PRODUCT DOES NOT CONFORM TO THESE LIMITED WARRANTIES, THE PURCHASER’S SOLE AND EXCLUSIVE REMEDY IS, AT COMPANY’S SOLE AND EXCLUSIVE OPTION, THE (1) REPAIR OF ANY DEFECTIVE PRODUCT OR COMPONENT PART OR (2) REPLACEMENT OF ANY DEFECTIVE PRODUCT OR COMPONENT PART.
COMPLETE PARTS LIST DESCRIPTION: 1. Resistance Adjuster 2. Oval Head Cross Screws MS-20L 3. Meter Wire 4. Oval Head 5. Curved Washer 6. Spring Washer for M8 7. Gearbox Plate 8. Inner Tube Gum Cover 9. Zinc Alloy Bearing Bracket 10. Bearing 11. Phillip Head M6-10-15L and M6 Locking Washer 12. Flywheel 13. Main Belt Wheel 14. Axial Spring Ring 15. Curve Washer 16. Idle Wheel 17. Drive Shaft 18. Bearing 19. Spacer 20. Hex Nut M10-1.25 21. Idle Wheel Adjuster 22. Idler Axel 23. Bearing 24. Circlip 25.
COMPLETE PARTS LIST 3240 9106 97 81 103 A 86 103 B 80 79 75 79 94 72 84 76 91 72 86 100 83 86 89 04 05 6 85 83 86 88 88 78 9108 100 80 77 86 82 84 89 88 6 87 4 92 93 67 74 73 66 70 98 57 74 69 72 50 37 51 63 3242 62 52 47 38 45 106L 61 69 25 71 25 46 9018 64 3242 54 46 02 74 6 65 68 88 03 01 44 42 8 53 49 11 43 44 40 39 41 45 46 42 14 9 11 42 20 29 21 10 96 24 23 38 25 37 33 25 57 5 34 75 24 26 57 57 5 37 60 11 14 39 9 55
OPTIONAL ACCESSORIES FOR MODEL: FDX 3.0 OUR MOST POPULAR ACCESSORY A Standard FitDesk® surface: 20.5” W x 16” D With Desk Extension Kit: 31.5“ W x16” D Desk Extension Kit Universal Saddle Adapter Allows you to use a saddle of your choice on your FitDesk® Water Bottle Holder To buy these Accessories go to our Website @ www.thefitdesk.
facebook.com / Fitdesk FitDesk® is a registered trademark of FD Products LLC.