vitavit® edition Fissler GmbH, Harald-Fissler-Str.1, 55743 Idar-Oberstein, Germany Tel. +49 6781-403-0, Fax. +49 6781-403-321 www.fissler.de, www.fissler.com 0710/20/BAST 630-000-00-921 Freu dich aufs Kochen.
070405fissler Blue Point Um.qxd FISSLER Fissler vitavit® edition D E O C 12:26 Uhr Seite 2 BLUE-POINT Fissler vitavit® edition 070405fissler Blue Point Um.qxd C 23.04.2007 23.04.
D GB F NL I E ARA CZ Your new pressure cooker has been meticulously crafted in Germany. To ensure that you will be able to enjoy it for a very long time and that it will have a long service life, please follow these instructions carefully. We hope you will enjoy trying out everything your vitavit® has to offer. Bon appétit! RUS 1. How pressure cooking works 2. Safety information 3. Description and advantages of the vitavit® 4. Before using for the first time 5.
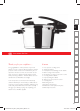
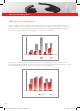
How pressure cooking works 1. How pressure cooking works The basic principle of pressure cooking hasn’t changed since the first pressure cooker was invented. Foods are cooked in a tightly closed vessel under pressure, at temperatures of over 100°C, since the high pressure that develops inside the pot raises the boiling point of water. This shortens their cooking times substantially. Cooking with a pressure cooker saves a great deal of (cooking) time – about 70 percent on average.
Safety information NL • R ead the Instructions for Use and all other information thoroughly before you use the vitavit®. Incorrect use can be dangerous. • Do not let anyone use the pressure cooker before reading the Instructions for Use. • If you give your pressure cooker to anyone, make sure you also provide the Instructions for Use. • Before using the vitacontrol electronic cooking assistant, please also consult the Instructions for Use which are enclosed separately.
Safety information / Description and advantages of the vitavit® Minimum amount: 200-300 ml of water, depending on the diameter of your cooker. (See „min“ marking) In case of extreme overheating, plastic parts on the cooker or the aluminum in the base could melt and liquefy. If this should occur, turn off the heat source and do not move the cooker until it has cooled down completely. Air the room. • Do not fill the pressure cooker to more than ⅔ of its volume.
GB F NL I E P GR TR RUS S PL CZ ARA 5. Control valve - to set the cooking setting - with the traffic light indicator - with a vent for automatic pressure limitation (pressure guard) - removable for easy cleaning - with depressurizing setting and gradual pressure release 6. Traffic light system - helps to regulate the energy source 7. Openings for steam release - when the selected cooking setting is exceeded - for depressurizing with the control valve - for steaming without pressure 8.
Schnellkochen Description andkurz advantages erklärt of the vitavit® / Before using for the first time 23. Molded valve seal - for sealing the control valve 24.Valve base seal - to seal the valve base 25. Insets for steaming (depending on model) - elongated perforations for optimum penetration of steam - with ridged surface for free steam flow, even with large items - with a tripod stand 26.
Before using for the first time / Information on using your pressure cooker See Fig. F The locking indicator (Fig. A-3) in the lid handle will tell you whether the cooker is correctly closed and ready to use: GB D Locking indicator Wash the pot, lid and silicone gasket thoroughly before using the pressure cooker for the first time. This will remove any traces of polishing dust and minor impurities.
Information on using your pressure cooker Filling capacity See Fig. L Please note the following information on filling amounts. A scale found on the inside of the pot will make it easier to measure these amounts. „min“ Depending on the diameter of the pressure cooker, at least 200-300 ml of liquid is necessary to produce steam, regardless of whether you are using an inset or not. Never use the pressure cooker without having this minimum amount of liquid (see „min“ marking).
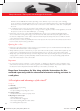
Gas stove: Place the cooker in the center, and make sure that the flames do not extend up the sides of the cooker. Induction: Always place the cooker in the center of the cooking zone. The base of the pot should be the same size as or larger than the cooking zone. Otherwise, it is possible that the cooking zone will not be triggered by the pot base.
Cooking with the vitavit® Selecting the cooking setting See Fig. M Select the desired cooking setting on the control valve (Fig. A-5). The table of cooking times (Chapter 9) will give you suggestions for this. Setting 1, approx. 110°C (Gentle Setting) (45 kPa operating pressure) for delicate foods, such as fish or vegetables Setting 2, approx.
Cooking times The actual cooking time begins once the selected cooking setting (green ring) has been reached. You will find the cooking times for various foods in Chapter 9. Basic rules: 1. The cooking time at Setting 2 is about ½ to ⅓ of the normal cooking time. 2. The cooking time at Setting 1 is about 50% longer than at Setting 2. 3. Cooking times for the same food can vary, since the amount, size and consistency of the foods influence the cooking time.
Depressurizing the vitavit® Method 1 “Quick depressurizing with the release button” See Fig. O Press the release button (Fig. A-2) gently in the direction shown by the arrow, and steam will escape from under the lid handle (Fig. A-4). Hold the button in until the traffic light indicator has fallen back into its socket completely and no more steam is escaping. Then release the button, shake the cooker gently, and press the release button again. Repeat this until no more steam escapes.
Depressurizing the vitavit® / Ways to use your pressure cooker Then press the release button gently to release any residual pressure. When no more steam escapes, let go of the button, shake the cooker gently, and then press the release button again. Repeat this step until no more steam escapes. When the cooker is fully depressurized, the Euromatic will sink. Then the release button can be pressed down fully to open the cooker. I 8. Ways to use your pressure cooker NL F See Fig.
Ways to use your pressure cooker Vegetables and potatoes Vegetables and other delicate foods can be steamed very gently in the perforated inset. Depending on the model, the inset may be included or else sold separately. • A dd a minimum of 200-300 ml of liquid (see „min“ marking) to the pressure cooker. If desired, also add herbs, seasonings or wine. • Place the washed vegetables in the perforated inset and put the inset on top of the tripod in the pot. • Close the cooker.
Ways to use your pressure cooker F NL I • A dd a minimum of 200-300 ml of liquid (see „min“ marking) to the pressure cooker. If desired, also add herbs, seasonings or wine. • Place the food in the perforated inset and place the inset on top of the tripod in the cooker. • Close the cooker. • Select the steaming setting and build pressure. • No pressure is built up, and the traffic light indicator does not rise.
Ways to use your pressure cooker • • • • • Fill the jars up to about one finger’s breadth under the edge and close them. Place at least 200-300 ml of liquid (see „min“ marking) in the pressure cooker. Place the preserving jars in the cooker in the perforated inset. Close the cooker. Select the cooking setting and build pressure. (See Chapter 6) Preserving times: Marmelade Setting 1 1-2 min. Fruits/pickled vegetables Setting 1 8-10 min. Vegetables/meat Setting 2 20-25 min.
Ways to use your pressure cooker / Cooking times D Cooking a whole meal First place the roulades in the cooker and cook them at Setting 2 for 12 minutes. Then remove the cooker from the burner, depressurize it, open the cooker, and place the potatoes in the cooker in the perforated inset over the roulades by using the tripod. Close the cooker, build pressure, and cook at Setting 2 for an additional 8 minutes. F E I Example: Beef roulades (20 min.) with boiled potatoes (8 min.
Cooking times Pork Spicy pork stew / Goulash Pork roast Pork shank Pork knuckle, fresh 15-20 min. 25-30 min. 30-35 min. 30-40 min. Veal and beef Veal Stroganoff Roast veal Veal shank 5-6 min. Setting 2 15-20 min. Setting 2 15-20 min. Setting 2 Beef goulash Beef shank (for soup) Roulades / Roast fillet Sauerbraten / Roast loin Roast beef Boiled beef 15-20 min. 20-25 min. 20-25 min. 25-30 min. 30-40 min. 40-60 min.
Cleaning and care Storage The silicone gasket should be stored in a dark place (protected from sunlight and UV radiation), dry and clean. The silicone gasket will last longer if you place the lid upside down on top of the pot after it is cleaned, so that the ring will not be crushed. Maintenance The parts of the pressure cooker that are subject to wear must be replaced regularly. You will find additional information on this in Chapter 12. F NL TR RUS S PL Lid handle (Fig. A-1) To remove: See Fig.
Questions and answers 11. Questions and answers Important: Always turn off the energy source and let the pressure cooker cool off before you attempt to eliminate a problem. Problem Possible reason How to correct the problem When the cooker is building pressure, steam escapes longer than usual from under the lid handle (the Euromatic). You have selected the pressureless steaming setting or a different setting below Setting 1. With pressureless steaming, it is normal for some steam to escape.
Possible reason How to correct the problem The traffic light indicator does not rise. Steam is escaping near the lid handle. See previous page. Steam is escaping at the edge of the lid. See previous page. Too little liquid was placed in the cooker. Add the minimum amount of liquid (200-300 ml). (See Chapter 5) The control valve is not attached correctly and firmly. Attach the control valve correctly and tighten the bell-shaped nut.
Questions and answers Problem Possible reason How to correct the problem A great deal of steam is escaping from the edge of the lid, although the traffic light indicator has already risen. The silicone gasket is defective. Replace the silicone gasket. (See Chapter 5 and 12) The silicone gasket has been triggered as a safety mechanism. This happens if the valve and the Euromatic are dirty or defective. Have the cooker checked by Fissler Customer Service.
Maintenance and replacement parts Replace parts that are subject to wear, such as the silicone gasket and other rubber parts, regularly after you have cooked with it about 400 times, or after 2 years at the latest, with original Fissler replacement parts. Parts that show visible damage (e.g. tears, discolorations or deformations) or that do not fit correctly must be replaced immediately. Otherwise, the functioning and safety of your pressure cooker could be affected. F Please note GB D 12.
Maintenance and replacement parts Replacement parts Replacement parts Diameter Article Number Silicone gasket (Fig. Y-1) 22 cm 600-000-22-795 26 cm 600-000-26-795 22 cm 630-300-02-850 26 cm 630-700-04-850 22 cm 630-300-04-850 26 cm 630-700-08-850 22 cm 630-300-02-840 26 cm 630-700-04-840 22 cm 630-300-04-840 26 cm 630-700-08-840 Lid handle (Fig. Y-4) all 630-000-00-770 Control valve (Fig. Y-5) all 620-000-00-700 Bell-shaped nut for control valve (Fig.
Maintenance and replacement parts Perforated inset (incl. tripod) (Fig. Z-1) 22 cm 610-300-00-800 26 cm 610-700-00-800 22 cm 610-300-00-820 26 cm 610-700-00-820 Additional lid, glass (Fig. Z-3) 22 cm 021-641-22-600 Additional lid, metal (Fig. Z-4) 22 cm 623-000-22-700 Unperforated inset (incl. tripod) (Fig. Z-2) 623-000-26-700 26 cm 022-656-04-600 vitacontrol electronic cooking assistant (Fig.
Warranty and service 13. Warranty and service All Fissler products are meticulously manufactured from high-quality materials. The quality of our products is checked several times during the manufacturing process. On completion, they are subjected to a stringent final check. 3-year manufacturer’s warranty This is why we provide a 3-year warranty on all of our pressure cookers beginning with the date of purchase.