CZ-3D Deep Search, 4-Tone, Target I.D.
CONTENTS About Your Detector ................................................................ pg. 1 Condensed Operating Instructions ........................................ pg. 2 Factory Preset “Turn-On-And-Go” Marks .............................. pg. 2 Setting Up .................................................................................. pg. 3 Hipmounting ............................................................................. pg. 5 Control Panel ...............................................
ABOUT YOUR DETECTOR Your CZ-3D is an extremely advanced and sophisticated instrument. It is maximized for a very specific function - finding & properly identifying older era coins at older sites. Simply select the "enhance mode" with the utilization of the "salt/ enhance" switch to find more rare coins! The CZ-3D was designed to find more good metals such as brass, bronze, copper, silver, and certain gold: reporting it as a high tone.
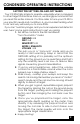
CONDENSED OPERATING INSTRUCTIONS FACTORY PRE-SET “TURN-ON-AND-GO” MARKS Your CZ-3D is fairly simple to operate, especially when compared to other target ID machines. Even so, we strongly recommend that you read this entire manual. You’ll be able to tune your CZ-3D to your specific needs and conditions. A good understanding what to do and why will lead you to more finds. If you can’t wait any longer, and you’re an experienced detector user, here’s some quick instructions to get you going: 1.
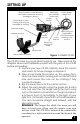
SETTING UP Drop-in battery compartments and cable connector at rear of housing(not shown) Removable control housing (belt loop on underside of housing) Adjustable non-metallic lower stem Center section 8-inch Spider search coil Foam hand grip Padded arm rest Upper lock nut Lower lock nut Nylon wing nut (replacable Duro-Neoprene bushings, not shown) Seven foot search coil cable Upper stem Built-in detector stand Figure 1. FISHER CZ-3D The CZ-3D comes to you just about ready to use.
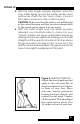
SETTING UP 5. With the stem length properly adjusted, wrap the loop cable tightly around the center section stem and secure it with the two Velcro straps. Connect the cable connector to the control housing. CAUTION: Make sure that the cable is not pulled tight at the control housing and that you have enough slack at the search coil to adjust it to any angle. 6.
HIPMOUNTING 1. Disconnect the cable from the control housing and unwind all but the last twelve inches from the stem. Secure the lower end of the cable with a Velcro strap at least twelve inches up from the coil. 2. Slide the control housing off the handle by holding the handgrip with one hand and pulling the housing towards you with the other hand. 3. Reconnect the cable to the control housing.
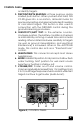
CONTROL PANEL or identify targets. 3. PINPOINT/DEPTH READING: A three purpose, spring loaded push-button. When pushed and held, the CZ-3D goes into a no-motion, all-metal mode for precise pinpointing and approximate depth reading of coin-sized targets. This button is also used in conjunction with the GROUND control during the ground balancing procedure. 4.
TURN ON PROCEDURE 1. Set your controls as follows: GROUND = 10 DISC = 0 for normal use in target ID mode. (Set DISC to “Auto tune” for deep search, all-metal Auto tune mode. SENSITIVITY = 10 MODE =ENHANCE VOLUME = OFF 2. Hold the search coil waist high, away from any nearby metal. 3. Turn the VOLUME control to 10. A brief bell tone is normal when you turn the VOLUME control on. If you’re in the Auto tune Mode, you’ll hear an audio “threshold” hum.
“PUSHBUTTON” GROUND BALANCE METHOD This will probably be your method of choice in all but the most difficult of ground conditions. It’s fast, easy and accurate. You can use this method in either the Autotune or Target ID mode. 1. With your controls set as in the “Turn-On” procedure, (GROUND control at 10), hold the search coil parallel to and 6 to 12 inches off the ground. Press the PINPOINT button and hold it until you’ve completed step 2. Make sure you’re at least three feet away from any metal objects. 2.
"BOBBING" THE SEARCH COIL METHOD 1. Set as in the “Turn-On” procedure, making sure the DISC control is at AUTOTUNE and the SENSITIVITY control is set so you can just barely hear a threshold hum. Hold the search coil parallel to and 6 to 12 inches over the ground and at least three feet away from any metal objects. Do not use the PINPOINT button during any part of this procedure. 2. Lower the coil to an inch or two above the ground and then quickly raise it.
“BOBBING” THE SEARCH COIL METHOD NOTES: 1. If you get an audio response as you first lower the coil with the GROUND CONTROL at 10, you’re probably over a piece of metal. Move and try again. 2. If you get a sudden bell tone, not preceded by an increasing audio response, you’re probably in some very highly mineralized soil or sand. Instead of lowering the coil to an inch or two above the ground as in step 2 above, stop just before you hear the bell tone and ground balance as instructed.
SEARCH MODES AUTOTUNE SEARCH MODE Set the DISC control to Autotune for a very sensitive, wide-scan, allmetal, motion search mode. Since this mode responds to all metal targets and does not have the ability to identify or reject targets, this will probably not be your normal search mode. The Autotune mode does have some advantages however which make it useful to use in at least two situations: 1. Non-Trashy Areas.
SEARCH MODES get a response. Keep in mind that for accurate target ID, the coil center must pass directly over the target. 5. Note the response you get over small targets. For small iron or steel targets, the meter needle will usually lock in the “IRON” category. Most pull tabs, foil, nickels and the newer zinc pennies will also be correctly classified. Silver coins, copper coins, and the newer clad coins will ID in the highest category. 6.
SEARCH MODES the surface may set off the bell tone. The optional, smaller 5 inch coil is more likely to overload than the standard 8 inch coil. 10. You may also note that some square tabs ID as round tabs and vice versa. Because of the wide variety of sizes, shapes and conductivity of the many pull tabs manufactured over the years, there is overlap as far as identification goes. Small pieces of tabs or aluminum are often misidentified. The tail of a round tab for example, may ID as a nickel.
SEARCH MODES FIGURE 4. TYPICAL CZ-3D AUDIO AND METER REPONSES.
SEARCH MODES SUPPLEMENT A. TOM DANKOWSKI'S "ENHANCED" ID CHART • “REAL WORLD - OTHER” = Probable reading of what all other detectors will ID the specified target as in real dirt. • “REAL WORLD - CZ-3D” = Most probable reading on the CZ-3D in ‘enhance’ mode. • TARGET/REAL WORLD "REAL WORLD OTHER" “REAL WORLD CZ-3D” • Dirt exposed Indian Head Cent Trash /mid-tone High-Tone • 1857-1864 White (nickel) Cent Square-Tab/mid-tone Square-Tab • U.S. 3-Cent Silver Trash/mid-tone High-Tone • U.S.
SEARCHING Good search techniques are as important to your success as having a good detector. 1. Make sure your CZ-3D is properly ground balanced and the MODE switch is in the proper position: SALT for wet ocean beaches, ENHANCE for just about every other situation. 2. Decide which search mode you’re going to use, Target ID or Autotune. Recommended starting point: Target ID mode with the DISC control set at “4”. 3. Set your SENSITIVITY control.
SEARCHING Figure 5. SEARCH PATTERN. When the stem length is properly adjusted, the CZ-3D is balanced for sweeping in a tight semicircle. Wide to the right for right handers. Wide to the left for left handers.Be sure to overlap your sweeps. Figure 6. COIL ORIENTATION Keep the search coil parallel and close to the ground at all times. Figure 7. SEARCH COIL DETECTION PATTERN 1. Minimum Depth a. Very slow or fast sweep speed. b. Discrimination set at “6.” 2. Good Depth a. Moderate sweep speed. b.
PINPOINTING PUSHBUTTON PINPOINT MODE Target location is quick and easy using the push-button Pinpoint mode. You do not have to keep the coil moving to get a response in this mode. 1. Once the presence of a target is indicated by the “beep-beep” of your CZ-3D, simply move the coil away from the target area, and with the coil lightly on the ground or very close to it, press and hold the PINPOINT button. It doesn’t matter which mode you’re searching in, Autotune or Target ID. 2.
PINPOINTING TARGET ID AND AUTOTUNE MODES Pinpointing in either of the search modes is difficult and requires practice. but with practice you should be able to get the hang of it. Many CZ-3D operators don’t even bother with the Pinpoint mode unless they want a depth reading. In Target ID or Autotune, simply use the same basic procedure for the Pinpoint mode, moving the coil side to side and front to back over the target area, stopping over the strongest audio response.
TARGET IDENTIFICATION 1. Once you’ve located a target, pinpoint its exact location as in the “Pinpointing” procedure. Since accurate ID is dependent on accurate pinpointing, it is recommended that you always press the PINPOINT button rather than try to pinpoint your target in either the Autotune or Target ID mode. 2. Once you’ve pinpointed your target, release the PINPOINT button. If you’re searching in the Autotune mode, switch over to DISC = 0.
TARGET IDENTIFICATION 7. Set your discrimination at an appropriate level. If there’s very little trash in the area, set it low, say at iron discrimination and dig every good signal. If there is a lot of trash present and you’re mainly interested in coins, set the discrimination level high—you may even want to sacrifice nickels and zinc pennies in extremely trashy areas. If you’re looking for gold rings, relics, artifacts, or small ancient coins, you’ll have to set your discrimination level low.
DEPTH READING Your CZ-3D will give you a quick and approximate depth reading of coin-size targets, usually within an inch. 1. Place the search coil lightly on the ground at least twelve inches away from your target area. 2. Press and hold the PINPOINT button. 3. Still pressing the PINPOINT button, bring the coil back over the target and pinpoint its location by stopping the coil over the point where you get maximum pitch, volume and needle response. 4.
TARGET RECOVERY Once you have identified and pinpointed a target, your objective is to recover it quickly and neatly, leaving virtually no trace of your excavation. There are almost as many ways to do this, as there are treasure hunters. Whatever works for you is good enough as long as you don’t break any laws, damage vegetation, or leave uncovered holes. Generally speaking, beachcombers do little if any damage to the environment while recovering targets.
RECOVERY TOOLS A heavy duty blunt screwdriver, sturdy hunting knife, or garden trowel are commonly used. Made especially for the Hobby of Metal Detecting are several well designed sand scoops, trowels, and digging tools . See your local dealer for more information. FALSE SIGNALS A “False Signal” occurs when something sounds like a good target, but is not. Your CZ-3D does a great job of discriminating, but bad “targets” with similar electrical characteristics can fool it.
FALSE SIGNALS Figure 8. TARGETS THAT AREN’T THERE. ? Coin lying at an angle or on edge. Long ferrous object (nail). Large deep target (water pipe). MAINTENANCE Your CZ-3D doesn’t require a lot of care. It’s built with high quality materials but there are a few things you should do to keep it in peak operating condition. 1. If you’re not going to be using it for a while, take the batteries out. Acid damage caused by leaking batteries can be severe. 2. Avoid extreme temperatures.
TREASURE HUNTERS’ CODE OF ETHICS LETS PRESERVE OUR TREASURED SPORT! Laws governing the use of metal detectors are becoming more and more common. In many countries, the use of metal detectors is illegal or severely restricted. Don’t let this happen in your area. ALWAYS get permission to hunt on private property. ALWAYS leave a site cleaner than you found it. Take at least some trash with you or, if you can, take it all. ALWAYS fill in your holes neatly whether you’re in a city park or remote wildernessness.
BATTERY REPLACEMENT Check your batteries frequently by clicking the SENSITIVITY control counter clockwise into the BATT test position. The condition of the batteries will be indicated in two ways: 1) An Audio Tone. The stronger the better. A loud, high-pitched tone indicates good batteries. A weak, low-pitched tone indicates weak batteries. 2) A Meter Reading. Replace the batteries when the needle falls below gray BATT area.
SPECIFICATIONS1 LENGTH 2 .............................Extended....................................................... 51" ..............................................Collapsed 3 ................................................. 41” WEIGHT 2 ...........................Complete ............................................... 3.7 lbs Control Housing ...................................... 1.5 lbs Handle and Coil ..................................... 2.2 lbs FREQUENCY ..........................................
SPECIFICATIONS SEARCH COIL ................................................................................................... Type ........................................ Concentric, Co-planar Spider Coil Diameter ................................ 8" Shielding ................................. 100% ESI10 Interchangeable .................. Yes Submersible............................ Yes WARRANTY................................
•QUALITY• Fisher detectors are renowned for their quality construction. In the Fisher tradition, each and every detector is hand crafted with pride. •PERFORMANCE• Since 1931, treasure hunters worldwide have relied on Fisher. Proven in the field durable, dependable, deeper. •REPUTATION• Dr. Fisher invented the first patented metal detector over 70 years ago. Today, Fisher continues to set the standard by which all detectors are judged.