
oven installation_guide
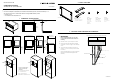


4 SCREW THE TRIM SURROUND ONTO THE CABINETRY
Secure the Trim Surround using the
screw hole locations shown
Using the 4 supplied screws, secure the Trim
Surround to the cabinetry in the correct hole
positions, as shown.
Pre-drill as necessary to avoid splitting the
wood.
IMPORTANT!
Do not screw through either center holes in
the Trim Surround.
5 SECURE THE TWO SUPPORT BRACKETS IN THE CAVITY
1 Position left and right support
brackets as shown inside, against
the walls of the cavity.
We recommend butting the
brackets up against the rear
frame of the Trim Surround.
2 Secure through front and rear
hole locations on both brackets
using the screws supplied.
Support
Bracket
6 INSTALL YOUR OVEN (REFER TO SEPARATE INSTRUCTIONS SUPPLIED WITH OVEN)
1 Install your oven as per the oven installation
instructions.
2 Ensure the oven and Trim Kit are correctly aligned
and the oven door can open and close freely, before
securing.
3 Using the 2 supplied Phillips 2” (50mm) screws,
secure through the inner frame of the oven and then
through the two upper hole locations on either side
of the Trim Surround, as shown.
591792A 10.18
Ensure you use the supplied
plastic screw grommets,
so that the oven is secured
correctly.