
User Guide
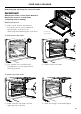
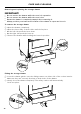
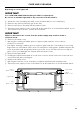
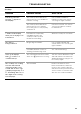
Table Of Contents
- User Guide
- Contents
- Safety and warnings
- Introduction
- First use
- Cooking guide
- Oven functions
- Cooking charts
- Setting the timer
- Auto Cook
- Locking the oven controls
- User preference settings
- Sabbath Mode
- Using your induction cooktop
- Locking the cooktop controls
- Using your cooktop’s special features
- Choosing the right cookware
- Cooking guidelines
- Using the storage drawer
- Care and cleaning
- Troubleshooting
- Alert codes
- Warranty and service

71
Notch
CARE AND CLEANING
Removing and replacing the oven side racks
IMPORTANT!
Always turn off the cooker at the wall first.
Ensure the oven has cooled down
completely before starting.
Remove all shelves
1 Slide out all shelves and remove.
For easier access we recommend
removing the oven door, see
‘Removing and replacing the oven door’.
To remove the side racks
To replace the side racks
2 Refit the fixing screws and tighten.1 Make sure the side racks are the
right way up, as shown.
Remove
all shelves
2 Use a small coin or a flat-head
screwdriver to loosen and remove
the fixing screws.
3 Remove the side racks